Stylish topiary made from coffee beans will decorate the living room, office space or common area. To make it, you should visit the grocery and construction goods store. The main thing is to first create an approximate sketch, because topiary is round, in the shape of a tree or a heart. Once everything is ready, you can get to work. For a beginner, the whole process will take no more than 2-3 hours.
Inexperienced fans of the hand-made style are advised to start with a spherical shape. There are several options for performing compositions, but the fastest way to master is the following. For the manufacture of the basis of the composition - the crown, old newspapers, polyurethane foam or polystyrene are taken. Each of the above materials keeps its shape, so when choosing, you need to build on your own preferences.
Use pencils, sticks, or strong wire for the barrel. The basis of the composition will be a container of a suitable size: a cup, a pot, a flowerpot.

Further actions will require the following materials:
- Sharp scissors.
- Nylon and satin ribbon.
- L 25 cm plastic tube with a diameter of 1.2 cm.
- A ball with a diameter of 8 cm - easy to find at a craft store.
- Capacity for composition.
- Alabaster and a container for mixing it.
- 2-sided tape.
- Glue gun.
- Coffee beans - it is recommended to choose expensive coffees so that the composition retains its aroma longer.
First, you need to carefully create a hole in the ball so that it matches the diameter of the barrel. Next, the process of applying coffee beans to the surface of the ball begins. It is important that they are always located in a strip downward with a tight abutment. Adhesion of the second layer of grains begins in 15-20 minutes. The specified time is enough for the glue to dry. It is important to remember - the second layer is applied with the obligatory stripes upwards.
You will learn how to create the simplest topiary in the following article:
Do not make more than 2 layers, otherwise the composition will become unnaturally large. The second stage of work is associated with the formation of the trunk. Using 2-sided tape, carefully wrap the future barrel. Then water is poured into the flower pot so that its level reaches exactly the middle of the container. Having measured the required amount of liquid, it should be poured into a container for mixing alabaster.

It is recommended to stir constantly and vigorously when mixing water and alabaster, otherwise the solution will become unusable. Readiness is checked by the degree of consistency density. You should focus on very thick sour cream. As soon as the mixture has reached the desired condition, it is quickly poured into the pot and the trunk of the future composition is immediately inserted.
Master class topiary from coffee beans "Flying Cup"
The above described actions with grains and materials are mandatory. Direct creativity begins at the stage of forming the appearance of the composition.
To make it, you will need the following materials:
- Coffee beans.
- A cup.
- A saucer to be degreased.
- Polyurethane foam.
- Copper wire.
- "Super moment".
- Transparent glue "Crystal", used for gluing the grains.
- 1-2 sticks of cinnamon.
- 3-4 anise flowers.
To begin with, you should carefully cut off 20-25 cm of the wire, measuring 7-8 cm from one of its ends, which then folds into a circle. The opposite part of the wire is bent by 4-5 cm. With the help of Supermoment glue, the bent part of the wire is attached to the surface of the saucer. The minimum time for the glue to dry is 4 hours. The recommendation that will keep the composition from destruction is to put a strong box under it. She will take on excess weight.

It must be used from the moment of the start of work and within 8 hours after its end. After that, a cup is attached to the opposite end of the wire with mandatory fixation on the box. Those who wish with their own hands should carefully apply polyurethane foam to the wire in the direction from the cup to the saucer in a small amount. You can go to the next stage after 24 hours.
After making sure that the future flying cup is dry, medium-sized grains should be applied using transparent glue. If desired, the polyurethane foam is painted, and the coffee stream is decorated with spices.
Making Topiary "Heart" from coffee beans
An unusual gift for your soulmate will be a coffee heart. You will need materials to make it, just like in the case of a floating cup. The only difference will be the use of star anise, twine, foam heart, brown paint.
The further procedure is as follows:
- Glue the heart-shaped blank with thick paper.
- Wrap it with threads.
- Form a loop at the top of the composition.
- Paint the prepared workpiece brown.
- Leave in a warm place to dry for 2 hours.
- Stick on the coffee beans with the flat side down.
- The second layer of grains is glued with the flat side at the top.
- Secure the anise star.

The composition ends with the formation of the trunk. If there are no ideas yet on how to decorate it, a photo will help you decide. From an aesthetic point of view, it is better to make a light barrel and a dark coffee heart.
How to make a topiary from coffee beans with your own hands: the secrets of craftsmanship
It is recommended that a beginner read thematic videos about the shapes and sizes of coffee crafts. As soon as a suitable option is selected, a sketch of the idea should be created. You do not need to draw in detail all the elements. The main thing is to convey the geometry of the project. If you have any difficulties, you can visit or watch a master class.
- Compositions with require additional support in the form of a dense box.
- Topiary tree with splashes of coffee is formed on the basis of a hard pencil, which is not prone to kinks.
- Only aromatic coffee beans with a clearly visible stripe are used.
- Additional means of expressiveness will help to make the composition more elegant: spices, sparkles, tinsel, etc.
The material on what materials can be used in the creation of topiary will also be useful:
Coffee topiary do it yourself (video)
It is not very difficult to create topiary if you follow a number of simple recommendations. tions. It all starts with a sketch, on the basis of which materials and decorations are selected. The glue used dries for at least 24 hours, otherwise individual elements will quickly fall off. After completing the work, you must leave the craft for 36 hours for final drying.
Topiary from coffee beans (photo)


How to make a coffee tree at home
Living indoor plants require careful and thrifty care, therefore, today designers are increasingly using artificial trees for interior decoration. Such an element of decor will laconically fit into the interiors of offices, cafes and apartments. A coffee tree can not only add zest to the atmosphere, but also become an excellent gift.

To make wood from coffee beans you will need:
- Knitting
Styrofoam ball (you can also make a ball yourself from threads)
- PVA and super glue
- pot
- wooden stick
- wire
- coffee beans
- ribbon, tulle, beads

Stages of work - manufacturing instructions.
- Preparation of the ball (tree crown). Choose a shape for the future tree. It can be round, triangular, heart-shaped, or made up of small balls. It is best to take polystyrene as a base. If this material is not available, you can make the ball yourself from cotton threads. Lubricate the round balloon with PVA and wrap it with thick threads, wetting each layer with glue. The product must dry completely. The ball is pierced and removed from the middle of the resulting blank.
- If using a Styrofoam ball, wrap it with brown threads to create a rough surface for a good adhesion of the coffee beans.
- Mark the area where the trunk will be near the tree so as not to fill it with grains.
- We glue the grains with the dividing side to the ball, and the smooth side will remain on top. Use PVA.
- To prevent the grains from falling off, leave the ball to dry for 30-40 minutes after you have pasted over half of the surface.
- When the first layer is completely dry (within a few hours), you can proceed to the second. Now fill the gaps with grains and glue them with the smooth side so that the division is outside.
- After the ball is dry, insert a wooden stick into the marked area for the barrel and cover the gaps with coffee beans.
- Plant the tree in a prepared pot. Instead of earth, take gypsum, diluted with cold water to a thick porridge. Leave the wood to dry in plaster overnight.
- Start decorating using ribbons, beads, tulle and others. If you want a curved tree, you can use wire as the trunk, which is best tied with green or brown thread.
I greet you on the pages of my diary!
Coffee creativity stuck with me only as the use of coffee broth for soap making :) To be honest, well, my hand does not rise in any way to use coffee beans for decorative purposes, or rather, they simply do not have time to apply in this way - my husband and I are inveterate coffee lovers :)
But how beautifully fragrant grains look in the decor! For some reason I especially like topiary - miniature well-groomed trees, lined with coffee beans and preferably decorated in an eco-style: with burlap, other natural materials, some kind of sisal twine-string, cinnamon sticks, etc. It seems to me that they give the house incredible coziness and natural harmony, and more often than not they fit perfectly into the interior with their unobtrusive colors.
I would like to bring to your attention a selection of ideas and a master class on making cute topiary from coffee beans. I think you should like it :) Enjoy your viewing!


I found the first master class on the DIY resource diy-enthusiasts.com. Sorry, there is no author name
Cut out the heart of the desired size from paper

Transfer the image to cardboard and cut it out

We pre-wrap the wire with paper and glue several wires to the heart


Well, now we increase the volume of the heart with the help of cotton pads


We tie the entire structure with threads, trying to give the shape of a heart

We paint with dark paint

Glue coffee beans


We form the trunk by wrapping the wire with a thread


We put a block of floristic foam in the pot and install the topiary trunk in it, fixing it with glue

Add decor


Nice topiary made from coffee beans, right?
In general, the logic of making such topiary is very simple. It is necessary to figure out what we will plant the tree in - here flower pots, and stylish cups, and cans or packages from yogurt-sour cream, etc., and peat pots, and various curly jars - there are a lot of options. Next, we think about the shape of the topiary and what can serve as a basis: if there is no ready-made form, you can always roll-up-roll-blind :) The papier-mâché technique does an excellent job for such purposes. Do not forget to think right away what will be the trunk - here everything that has or can acquire the necessary hardness will come to the rescue: these are pencils, and hardened wire, and cinnamon sticks, branches, etc. And, of course, we need to fix the tree in a pot somehow: you can just fill it with gypsum, you can, as in the given master class, plant it in floristic foam, you can fill it with polyurethane foam, fill it with sand-earth, fill it with plasticine or salt dough, a lot depends on the size of the structure and the severity of the "top" :) And, of course, we definitely add a cute decor :) The lesson is very pleasant :)

And a little more about warmth and home :)
Home textiles, pillows, blankets and other home bedding are now quite expensive - I mean good quality, not for a couple of weeks :) And if you need to purchase home textiles, I highly recommend trying to find like-minded people for joint purchases - saving more what is essential, my personal experience shows that the price as a result may differ from the retail price by 2 times, i.e. by 50% downward (!). Profitable, right? And you can find a lot of offers and options. For example, for Russians I recommend paying attention to the company Bivik(bivik.ru), which has been producing and selling home textiles for over 15 years, I think many people know this brand. They sell not only bed linen, but also pillows, mattresses, blankets in bulk; they also offer bedspreads, towels and even home clothes. Use :)
![]()
I wish everyone a pleasant weekend and sunny weather!
![]()
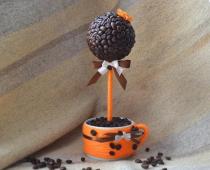
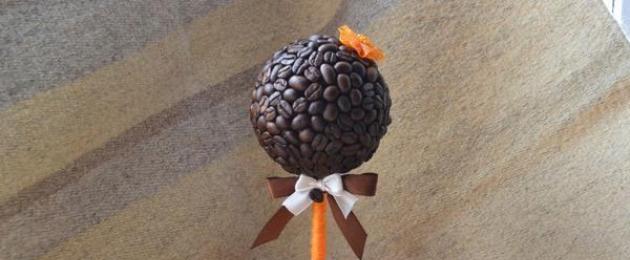
A fragrant coffee topiary will not leave anyone indifferent: this decor will decorate the living room, kitchen, office or public place. This is a great DIY gift that even a beginner can handle. With some skill and preliminary preparation, the process takes no more than 2-3 hours. We will tell you everything about coffee beans topiary: what are the features, how to make it yourself, what are the interesting options.
Types of coffee topiary
In general, topiary is the art of curly pruning of trees and shrubs, resulting in a topiary - a tree with a round crown, a bush in the shape of an animal or a heart, etc. The first topiary made from coffee beans was made precisely in the shape of a round tree with a stem-stem. Further, the fantasy took a step further, other variations of geometric shapes appeared, but the name stuck.

- Volumetric heart;

- Star;

- Floating cup;

- Flower;

- Products on a support leg;

- Suspended;

- Round balls for decoration.

On the Internet there are many workshops on making topiary from coffee beans with your own hands, and you can be inspired by various implementations, repeat a beautiful product or come up with something of your own.
We will tell you how you can make an unusual topiary from coffee beans and decorate it in various ways.
- Before gluing the grains, do not forget to treat the surface so that the background does not shine through. This can be done with brown gouache, but it is better - with finely ground coffee, it will have an additional aroma, and it looks noble. It can also be used to process the stick itself.
- As a base, you can choose a cup, a mini-coffee pot or milk jug, a decorative bucket or a flower pot (but you need to glue the hole in the bottom in it). You can put the cup on the saucer, glue it so that the product does not turn over.
- A stick-barrel is usually wrapped with double-sided tape, and a decorative tape is wound around it. The thinner the tape, the more elegant everything looks. Coarse twine is also used.
- As a decor for topiary made from coffee beans, you can use spices, dried orange slices, star anise (anise, in asterisks), for a mosaic pattern - white beans.
- Usually gypsum or alabaster is poured into the base - they quickly solidify and hold firmly. If you have a massive top, you can add heavy stones to the plaster of paris to keep the whole structure stable and not topple over.
- Try to choose one variety and one roast. That is, it is better to take not a mixture of Arabica and Robusta, but one thing, and optimally - in a large package, so that the difference in shades is minimal. Arabica is used more often, as it has beautiful beans with a pleasant aroma. But Robusta is rounder, which is sometimes more practical.
- Experts recommend glueing grains on topiary in 2 layers. So under the upper one shines through the lower one, the composition seems deeper, it becomes more interesting. The first layer is usually glued with the middle strip down, the second, outer one, with the strip up.
- The most beautiful grains are selected for the upper part. The ones on the bottom are less noticeable, and beans with slight color defects can go there. If you glue in two layers, sort the grains in advance, choosing the best ones for the outer surface, which will be in plain sight.
- You can glue not only with the plane of the grain, but also with one edge, so that they stick out as if perpendicularly. This is more difficult and painstaking work, but the result is more impressive.
- Topiary made from coffee beans can be thematic. For example, double, for a couple, or wedding, with appropriate decor, or Easter, or Christmas. It all depends only on your imagination.
Many are worried about the question: is it worth covering the topiary made of coffee beans with varnish. Covered with a glossy shine and is easier to care for. But the varnish clogs up the whole aroma of the beans. So it's up to you to decide.

Consider a simple decor option that even a schoolchild can handle - the classic topiary made from coffee beans "The Tree of Happiness". On average, the work takes up to three hours if everything is prepared in advance.
You will need:
- The basis for the figure. For example, a foam ball. It is sold in art stores, sometimes you can find it in flower or hardware stores.
- Stem-trunk. As an option - an ordinary strong twig, and even if it is not perfectly flat, it’s even more interesting. You may need to remove the bark from it.
- The base is a cup, for example.
- Plaster or alabaster.
- Cloth tape and double-sided tape for wrapping around the leg.
- Coffee beans.
- Brown gouache. In extreme cases - black. Or ground coffee. What you will cover the base with.
- Glue. PVA is possible, but mounting is better. It is better not to use a hot pistol. Superglue can come in handy, so grab some.
Let's start making topiary from coffee beans:
- Make a hole in the base so that the leg fits about a third of the ball's diameter.
- Color the base and set aside to dry.
- Go through the grains, decide in how many layers you will glue them.
- Starting at the top, apply a little glue to the area and secure the grains.
Do not apply glue to the entire ball at once, and then sprinkle it with grains or roll it in them. This speeds up the process, but the result looks messy.
You can put a bowl of water next to it, slightly wet your finger so that the grain sticks to it, and so transfer it to the base.
- When you get to the bottom edge, leave a small area around the hole for your wand.
- Wrap the stick first with duct tape, then with tape.
- Apply glue to the stick and a little into the hole, insert the leg, let it dry a little.
- Add the rest of the grains.
- Pour as much water into the base dish as you need. Stir in gypsum or alabaster, insert the leg of the structure, hold so that it hardens evenly.
- When everything is dry, decorate with alabaster (you can stick the grains).
- With the help of superglue, glue the spices, decor. Tie decorative ribbons.

It is better to let the product dry for a day, and then hand it over. If any of the grains falls off, attach with superglue.
This is a much more difficult level of coffee bean topiary, and it is better to take on such decor when you already have more experience. The difficulty lies in fixing the cup so that its center of gravity does not go beyond the saucer. The base of the "pouring" grains is usually made of wire, which is glued with glue for a moment. Sometimes it is wrapped with a cloth, sometimes polyurethane foam is used. There are many options, it is worth carefully studying all the nuances. And it is better to try it for the first time on cheaper dishes, so as not to spoil the composition intended for the composition, and to make sure that everything sticks well.

Don't start making large flying cups with loose grains. Try with little ones, it will be easier and more accurate.
Conclusions:
- Topiary from coffee beans can be made by hand in 2-3 hours.
- Usually, a round ball or a voluminous heart is chosen for the shape. Any shape you find at a craft store will work.
- A flying cup is a rather complicated topiary, but it can also be made at home.
- For decoration, you can use ribbons, bows, spices, grains, figurines and much more.
- If the product is not varnished, it will exude a subtle pleasant aroma. But varnished is easier to wipe off dust.
Topiary is a universal gift for a birthday, New Year, housewarming - any other celebration for a man, woman, child, decoration of the decor of any interior. This is not about trees and shrubs that are regularly trimmed to shape. The ancient gardeners took as a basis evergreens with a dense crown. By purposeful leaving, they were turned into balls, columns, gazebos. In Russia, the artistic haircut of plants was introduced by Peter the Great, but it was available only to a few rich and noble.
Today, beautiful manicured gardens with geometric designs are undergoing a rebirth. Topiary leaves no one indifferent, but not everyone has the opportunity to grow such gardens at home, and people brought the art of creating topiary into the house, growing tiny trees for interior decoration. Now you don't even need to grow it - it is very fashionable to decorate the house with artificially created trees. What is not used in their creation: natural material, food, feathers, shells, pebbles, cocktail umbrellas, beads, ribbons, flowers, buttons .... But the most popular material for making the tree of happiness is coffee beans. And the do-it-yourself topiary from coffee beans looks interesting and even exudes a lively, invigorating aroma.
If cutting a live topiary requires special skill, then everyone can “grow” our tree of happiness. You can buy a decorative tree in the most luxurious design - from amethyst, citrine, crystal or coral - in the store, but how can you buy happiness? It's in our hands!
What is the tree of happiness
Even a beginner is able to master this art: it is easy to work with coffee beans - they do not crumple, do not break, and no special materials are required for such a tree, all of them are affordable and are always on sale. First of all, you need to prepare

Topiary made from coffee beans
Tools and materials
- 100 g of coffee beans evenly roasted;
- children's sippy cup (can be bought in stationery);
- natural whitewash brush (available on the market and in hardware stores);
- a plastic ball measuring 8 - 10 cm (from a toy store);
- brown threads;
- scissors;
- two rubber bands for money;
- transparent universal glue;
- a glass of sand;
- gypsum or cement;
- stick or branch about 20 cm long and up to 2 cm thick;
- twine (50 cm).
Step-by-step instruction
We begin to create a topiary with our own hands from coffee from the crown of a tree, for which we carefully cut a hole in a plastic ball with scissors along the diameter of the trunk.
 If the ball is bright, contrasting in color, it is worth painting it with acrylic paints to match the coffee beans - it will be easier to mask the voids. Disassemble the whitewash brush by cutting the ropes and disassembling the washcloth into strands. At one end of the future trunk, we fix the end of the thread with an elastic band - baked. We coat the stick with universal glue and tightly lay the turns in a spiral. At the end, we put on an elastic band again.
 We insert the barrel into the ball until it stops. For reliability, you can fill the free space with napkins and add a little glue. It is easier to glue the grains not on a plastic base, but on a net of threads. Therefore, we first wrap the ball with brown threads and fix it with glue. You can also use strands from a whitewash brush for this purpose.
 A do-it-yourself coffee topiary master class will be incomplete without describing some of the details, in particular the preparation of coffee beans. We open the package and sort the grains by size and quality: round shapeless ones will go to the base in a pot or to a coffee grinder for decoration; pieces with defects - directly into the coffee grinder; not quite even, but strong - on the first layer of the crown; fill the voids with small integers; pointed - at the joints; smooth, large and beautiful - on the top layer.
Pasting the ball. Prepare transparent superglue, brush and grains for the first layer. For a better relief, it is advisable to glue them on different sides one by one. We apply glue to each grain quickly and accurately (leaves indelible stains on coffee, quickly sticks to the hands). Work in a ventilated area. To prevent the smell of glue from blocking the aroma of coffee. You can work with a heat gun or liquid nails.
One layer of coffee is not enough, after drying we cover the topiary with a second layer of the largest beans, not forgetting to alternate the grooves and the smooth side. To prevent the glue from leaving glare, you need to work especially carefully.
Decorating the pot
- Now for the exclusive pot. We begin to glue the bottom. For this we lay out a layer of strands from the brush in size slightly larger than the bottom area, apply glue to the bottom of the pot and glue the washcloth. Cut off the protruding parts.
- We decorate the pot itself. Cut the strands 3 cm longer than the height of the pot. Apply glue to the glass. Before reaching the top of 2-3 cm, glue the sponge in even dense strands.
- After pasting, pull the bottom of the pot with twine. We trim the edge so that it is 2 cm higher than the glass level.
- We glue the funnel with strands from the brush and insert the tree trunk into it.
- We fill the container with plaster, sand or alabaster.
- We insert the funnel into the glass. We tie the upper part with twine, cut the ends.
- The crown can be covered with a protective layer of transparent varnish or paint, but many craftsmen skip this stage, because such a treatment completely discards the aroma of coffee - the highlight of the coffee tree.
And finally, the most interesting moment is the decoration. Fruits and flowers are a symbol of sympathy and prosperity, coins are wishes for wealth. The coffee aroma and the cinnamon aroma go well. You can attach an anise star to the top.
You can use jewelry to mask some minor defects. At the base of the trunk, glue a few coffee beans - an association with fallen leaves. Can be decorated with a bow, butterfly, ladybug. A photo of a topiary with your own hands from coffee, you can find interesting ideas for yourself.
The master class presents a classic version of a round coffee topiary. But what prevents us from deviating from the rules and making a crown in the form of an ellipse, pyramid or cube for an original gift. The heart-shaped topiary looks especially romantic and expresses feelings without any words.
Coffee heart
Tools and materials
- a sheet of cardboard;
- thermal gun;
- spool of brown thread;
- silk ribbon;
- skewers;
- coffee beans;
- newspapers;
- gypsum;
- pot;
- corrugated paper of red color;
- sackcloth.
Step-by-step instruction
The list of materials seems to be not small, but many components can be easily replaced with what is at hand. For the crown, we need a sheet of cardboard, a soft, non-glossy newspaper or magazine, and coffee beans. Prepare a heart template. You can print on a printer or fold the sheet in half, then the halves will be symmetrical. 
- In contact with 0
- Google+ 0
- OK 0
- Facebook 0