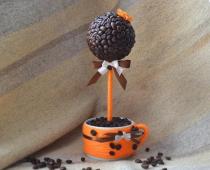
What to give grandmother for March 8? Gifts from grandchildren are the most expensive, so grandmothers will be happy about everything. It is especially important that the baby is involved in the preparation of the gift. Here is one of these gifts I want to offer today and I will show you how to make salty dough for the baby's footprint.
When I saw this idea for the first time, it won me over. No, it is not new, but the simplicity of its implementation immediately prompted the desire to repeat it for myself. I hope you find it inspiring too.
Necessary materials
- salt- 1 glass
- flour- 1 glass
- water- 1/2 cup
- rolling pin for rolling out the dough
- kitchen knife
- acrylic paint
- tassel for drawing
How to make foot prints on salt dough
1. Cooking salted dough
Mix salt (1 cup), flour (1 cup), and water (1/2 cup)... We mix everything well to get a homogeneous dough.
The child can also help in this process. With his little fingers, he will love to stir the dough.
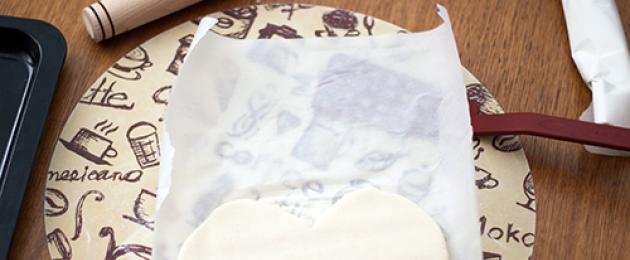
2. Cut out the heart
Roll out the dough with a rolling pin to make a plate with a thickness of about 1.5-2 cm.

Cut out the heart
Put the heart on a baking sheet. I still covered the paper for baking, but because of this, the bottom of the heart turned out to be uneven. Probably, it would be more correct to just put it on a baking sheet without paper.
I would be glad to hear your comments on this if you repeat the idea.
3. Footprints
We make an imprint on the heart with our bare feet.

Foot prints
We got it right the first time. Although the child does not practically stand still, but those seconds that we need to leave an imprint, he stood still, enthusiastically watching the process.
With the help of a spoon, we make an inscription on the heart.
4. Baking in the oven
Preheat the oven up to 100 degrees and put the baking sheet with the imprint of the baking legs for 3 hours.
5. Paint the footprint
After I removed the print from the oven, I let him cool down for a while and then carefully peeled off the baking paper.
The original recipe says that you can paint a heart almost immediately, but I have it a couple more days lay down.
For painting I took acrylic paint... It dries quickly.

We paint the imprint of the legs
First I painted one side, and at the end of the day - the other.

We paint the imprint of the legs
The child can also be involved in this process. Even if it turns out less neatly, the main thing is the process. I haven’t decided on this yet. We are now at the age when a child wants to do everything himself, he would not let me help, and at some point he could just drop and break our imprint.
I am very pleased with the result. Only now has to be found deep photo frame to put our gift in it.
I deliberately did not make a hole for hanging. The heart turned out to be not very light and could simply not bear its weight, fall and break.
Please leave your review or comment. I am very interested in your opinion!
If you have small children in your family, then this idea is just for you! Freeze the moment by leaving impressions of small hands or feet as a souvenir. By placing them in a frame, it will be possible for many years to remember the happy moments and joy associated with this precious time.
Well, you can make several casts, while your baby will grow and create a whole collage, which in the future will be interesting to the child himself, on it he himself will see how his arms and legs grew, but if you supplement the collage with photos, then You will definitely see a corner in the house that will cause smiles and joy every time you walk past it.
We will tell you about two ways how you can make impressions yourself - prints.
The first method - we need: fine sand, alabaster, a container of a suitable size, a brush, decorative elements (buttons, shells, pebbles, small toys, etc.).
We pour wet sand into a container, while it is important not to tamp it too much.
Now we carefully make prints of handles or legs in the center of the container, along the edges of which we also print our decorative objects.
Then we breed alabaster, its consistency should be similar to sour cream. Remember, alabaster hardens very quickly, so immediately proceed to pouring carefully - carefully pour a 2-3 cm thick alabaster onto the sand so as not to damage the prints. We leave it to dry for 15-20 minutes, and then carefully take out the frozen plate of alabaster, brush off the sand with a brush - and admire our prints, which can be painted with paints or decorated with decorative elements, inscriptions.

The second way is to make prints of legs or handles using salt dough.
To begin with, of course, we will prepare the dough - for this we mix 1 glass of wheat flour with one glass of fine salt, add water (about 0.5-1 tbsp). Knead a tight elastic elastic dough.
Now we will give the dough the desired shape, but do not roll it out thinly - otherwise the impression will not be made. Level the surface of the dough with a flat object or rolling pin, after which the foot or handle can be imprinted. If the print does not work the first time, you can roll out the dough again.
After you get a beautiful cast, you can draw patterns around the edges with a stick, then place the product in the oven for 2 hours, the oven temperature should be about 100 ° C. If you have a rather thick cast, it may take more time to dry. After you take the product out of the oven, it is advisable to let it lie down at room temperature for about 5 hours, and only then you can start decorating and decorating the cast with decorative elements.
You can place the casts in a frame or drill a hole (and if you are making an impression from the test, you can make a hole in advance) and hang it on the wall. Casts - Prints are also a great gift for dad or grandparents. Well, if you are already making a cast with an older baby, then this activity can turn into an exciting joint pastime!

Of course, we forgot to mention the funniest and easiest way to make fun prints - just give your child paints and take paper. Colored palms in paint - and you have a lot of ready-made prints as gifts to all your relatives and friends! Just worry in advance that the paints are not allergic to the delicate children's skin!

Children grow up very quickly, so have time to catch and stop the moments that will delight you all your life!
Life flows, children grow up, mothers and fathers release them, and in the soul there are only touching memories of how small they were ... Parents try in every way to capture their children: they take photos, videos. We offer another interesting way - to make casts of the baby's arms and legs.

Time is so fleeting ... It would seem that not so long ago children learned to walk, but today young grandparents are looking at photo albums and souvenirs related to the childhood of their grandchildren's parents. More and more generations are brought up on such memorabilia. Family stories backed by "physical evidence" are always far more valuable than those with nothing to add. One of such nice "proofs" that mom and dad, it turns out, were also small, can be a hand-made panel with casts of handles and legs. You can make casts of the baby's arms and legs with your own hands in several ways, we will tell you about the most accessible ones.


How to make an impression of the baby's arms and legs?


Sand cast of handles / legs
We will tell you about the simplest method that a mother who does not know the art of sculpture can easily handle. The cast can then be decorated with buttons, shells and chains.
Useful for creativity:
- fine sand;
- cookie tin box;
- alabaster;
- brush.

How to do it?
1. Sand is poured into the box and leveled. A child's imprint is made in the center.
2. Next, the alabaster powder is diluted very quickly with water to the consistency of thick sour cream.
3. It is poured into the cast with a thin stream. The thickness of the material above the sand is from 2 to 4 cm.
4. The container is left for 20 minutes or more, a mold is taken out and the grains of sand are removed with a brush. Then you can start decorating the cast.


Decorative panel "Leg handle casts" from auxiliary materials
- We make salty dough from half a glass of salt and a glass of water, add enough flour to make an elastic dough. To prevent it from sticking to the arms and legs, it must be kneaded and allowed to stand for a while. If you wish, you can grease the palms and feet of the legs with vegetable oil, but you can do without a well-mixed dough.
- If the baby is only a few months old, he can pull the oiled hands into the eye, he can unwittingly wipe them on his mother's clothes. It is not always possible to make casts when the child is asleep, because the handle will have to be pressed, and the leg is generally better done while standing for good pressure. After all, all the lines of fate should be imprinted!

3. Do not think that we have made too much dough, because it needs to be divided into 4 equal parts in order to remove prints from two pens and two legs. Gently press the baby's dry handle or leg into the resulting thick cakes. If the drawing could not be made clear, the dough can be crumpled and the procedure repeated.
4. Before taking the prints, select suitable containers or boards for the pieces of dough, because impressions from the dough are only the first stage of work. It would be possible to leave them, but after a few months the dough will lose its shape.
5. We got four cakes with indentations in the form of feet and hands.
6. Now you can dilute dry gypsum or alabaster to the consistency of thick sour cream. Stir well so that there are no air bubbles or unmixed lumps. Do not forget that alabaster hardens very quickly, you need to act with it extremely quickly, with plaster you can work more slowly. Pour the resulting solution into the recesses to their edges and leave to dry completely. After that, we clean the casts from the test, preserving the structure of the imprinted skin.

7. It is best to paint with gold or bronze from spray guns. These materials are much better than other paints, they emphasize the texture and will look great on your panel.
8. On the prepared rectangle or square of thick cardboard we glue either a special gun with glue or liquid nails, the casts obtained, a photo of the baby, around you can put an ornament of buttons, pieces of plastic, feathers and other beautiful little things. And we insert the casts into the frame.
Someone uses plastic instead of salt dough, someone buys special sets for impressions, but the dough inspires more confidence in that it is environmentally friendly.

Casts of handles and legs from dough - video
Homemade ceramics "Handle-leg casts"
- Wet sand can be used instead of dough. But for this you need to find good clean fine sand or thoroughly rinse the existing one. Then pour it into the selected container.
- Let's say you have chosen a round or oval container, in the center of which the baby's leg can easily stand, and along the edges you can arrange shells, circles, a chain, beads - everything that can be beautifully and embossed on wet sand. The entire resulting composition will need to be poured with the same alabaster or gypsum, and when everything is dry, the surface must be cleaned of sand and painted.

3. You don't need to glue anything on the cardboard, but you will have to choose a frame for the formed round or oval plaster panel. However, if you immediately decide on a beautiful and neat container and will not get anything out of it, its edges can serve as a frame, only a hole in the upper segment will have to be drilled in advance so that the head of the self-tapping screw will enter into it, on which you put the decoration.
4. Clay rather than gypsum can be a more logical material here. And you get a great ceramic disc. All that remains is to figure out where and how to burn it. But this is for those who have experience with clay.

Ideas - baby prints


Now my sun is already three and a half months old, and every day she is getting older and bigger, although I do not notice it at all. That is why I wanted to have at least something in memory of her as she is now.
Once I came across an advertisement for making compositions with clay casts of children's hands and feet. Of course, I really liked the idea - after all, having a cast of your favorite feet and hands is much more pleasant than just a print or a contour drawn with a pencil around thin sweet fingers. But I decided not to resort to the help of strangers, but to do everything myself - it's much more pleasant, and the baby can be frightened of strangers.
I did it like this:
1. Knead the salted dough.
The best way to make an elastic salt dough is this recipe:
2 cups of flour
1 glass of salt (preferably fine)
1 tbsp starch / hand cream / vegetable oil
0.5 - 1 tbsp. water
All ingredients must be mixed thoroughly. The mass should be quite thick. The dough should not crumble. If it turns out to be too thick - add a little water, too thin - salt with flour (it is always necessary to observe the ratio of flour to salt 2: 1).
2. When the dough becomes like this:
We tear off small pieces from it, on which we will make prints of children's legs and pens, something like this:
3. Now, we bring a piece of dough to the child's foot, and snuggle it tightly. We need to get as deep an imprint as possible. Ideally, all the lines on the baby's foot should be imprinted on the test, but I will say right away: it is quite difficult to achieve this, at least when making prints in this way.
Making a pen imprint is more difficult, especially if the child is not yet six months old - my baby always took pieces of dough with her)))
5. The last two procedures can be repeated indefinitely. I made about five to seven prints of each foot and each hand in order to be able to choose the most successful ones.
6. There are two ways further. You can first bake the resulting prints of children's hands and feet in the oven (about 30 minutes at 130 degrees), or you can work with raw dough. In the first case, you can use each print several times. In addition, if you bake the dough for longer, you can save the mark itself - it also looks very good. You can make a memorable composition with him)). However, raw dough impressions are easier and faster.
I tried both methods, and I liked the second one more.
7. So, take a baked or raw print of a child's foot or hand, and fill it with plaster. This must be done quickly, until the plaster has hardened.
We leave the impression to dry directly in the form for 15 minutes.
If you are using a print made from baked dough, it is best to grease it with petroleum jelly or vegetable oil first so as not to damage the print when you take it out of the mold.
8. We take out the casts, clean the dough remnants (if you used raw dough) and dry them. It will take a long time to dry - 3-5 days.
9. Grind the plaster casts with a knife and sandpaper. We cut through the fingers, remove all unnecessary, make the surface smooth. Be careful - make sure that all baby lines are preserved.


A wonderful master class on how to make prints of your baby's pens and legs for memory. - sleeping baby.
In addition, you also need:
150 g flour
- 75 g salt
- 2 tablespoons of vinegar
- 1 spoonful of vegetable oil
- 300ml of water
- two shallow molds
- gypsum
- an old plaster pot (which you will not mind throwing away)
Pour flour, salt into a Teflon dish (so that the mass does not stick to the walls) and add water, in which the rest of the products were previously stirred. Cook over medium heat, stirring constantly. After about 3 minutes, the mixture will start to stick together, continue to cook, stirring occasionally. Finally, a ball will turn out from the mass, which you continue to turn over and warm up - when the flour warms up, the mass will cease to stick to your hands. Finally, put the finished mass to cool and you can start!
1. If you are going to make two impressions, divide the mass into two parts and fill the molds with it. 
2. Now the hardest part is to make an impression of the baby's hand or foot. It is desirable that the impression is at least 7 mm deep, and deeper is possible. If it doesn't work the first time, it's okay, take out the mass, knead it and put it back in the mold. The print is made in the following order: first the base of the palm, then the palm, then each finger, if you start the print with the fingers, it will not work. 
3. We will leave the obtained impressions for now, and in the meantime we will mix the gypsum: it should be neither thick nor liquid, it should be current in order to fill the impression well. 
4. Do not rush to take out the impression, let it harden well, preferably until the next day. The next day, carefully remove the dried impression, remove the adhering mass and put it in the oven at 50-60 ° C on parchment (the high temperature may not withstand and crack). 
5. Dry plaster is light, you can brush the finished impression of the legs and handles to keep it even and clean. Do not forget: neatness and patience! 
6. If you want, you can paint the paws of our kids with gold or silver paint and place them in a frame. 
- In contact with 0
- Google+ 0
- OK 0
- Facebook 0