Fans of unusual things have long appreciated the coffee topiary that came from the East. It is easy to use the materials at hand. The main thing is to find a source of inspiration. You can do this by walking down the street, looking through thematic catalogs, or simply by listening carefully to yourself. The key to success will be pedantry and confident hand movements.
It all began many centuries ago in garden design, when people learned to figuratively change the shape of bushes and trees. With the spread of classicism in Europe, gardening traditions have become the norm in many countries. In the middle of the 19th century in China, for the first time, they began to use a well-known technology to create a tree that was not similar to any existing species.

The history of this unusual decorative art goes back almost two hundred years. National schools have been formed in each country. Exhibitions are held annually, where craftsmen demonstrate their skills.
DIY coffee topiary: numerous types
It is enough to look at the numerous photos to literally lose the power of speech from the flight of the imagination of the masters. Each of the presented topiary has a unique shape, color, geometry and style. Depending on the occasion, social status and age of the recipient, you can choose one of the creative projects for implementation:

Designers distinguish the following types of compositions:
- For kids;
- For decoration of premises;
- Gift;
- Anniversary;
- Cash;
- With modified geometry (for example, "").
Do-it-yourself topiary "coffee tree": photos and tips from the masters
It is difficult for a beginner to overcome fear before starting work. That is why step-by-step instructions in the form of photographs must be in front of your eyes. The first few songs will seem daunting, but it will get easier over time.

To help beginners, designers have developed several guidelines:
- If more than 1 layer of grains is applied, then the first is always fastened with a strip down, and the second - with a strip up;
- PVA glue or "hot glue" is used;
- It's better to start with a sketch - this will help determine the amount and type of materials needed;
- It is necessary to maintain a balance - excessively bulky compositions are not stable.
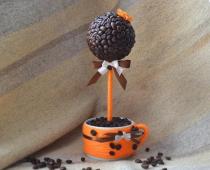
Topiary from coffee "gentleman": a gift for a real man
Finding a memorable and unconventional gift is not easy, so sooner or later people come to the idea of doing everything on their own. It's easy to make the upcoming birthday of your boss, brother, husband or groom unforgettable. This will require 3-4 hours of free time.
Even if the master is not familiar with the tastes and preferences of the hero of the occasion, such a gift will have to go to the court.
More ideas for creating a topiary for a man can be found in the article: n

You can create coffee splendor as follows:
- Buy a blank ball in a needlework store;
- Purchase 250-300 grams of aromatic coffee beans;
- Fix the grains in 2 layers on the surface of the ball with a glue gun;
- Glue the hat to the ball;
- Paste over the curved wire with a dark twine;
- Put the ball on the wire;
- The pot where the composition is placed is decorated depending on the preferences of the culprit.
Making coffee topiary with flowers
Floral motifs have always been popular for their versatility. Poppies, roses, wildflowers and bouquets all create a cozy atmosphere in the room. You can create a composition with flowers at home.
How to make a topiary with your own hands - tips for beginners:

Most often, flowers are made using satin ribbons or corrugated paper. Polymer clay is also used, from which flowers are extremely beautiful.
The flower arrangement is usually fastened from one side, from the top in the center, or the flowers are distributed evenly throughout the topiary.
Minimalist coffee and twine topiary
Designers have learned to use objects around them in various creative projects. For example, a mug is part of the topiary or its basis. Depending on preferences, everyone chooses an option for themselves. It is not difficult to create an unusual piece of jewelry or a gift. The main thing is to decide in advance on the preferred execution option. Fans of vintage style will appreciate the simple, but very effective composition.

It is created from a mug, twine and small decorative elements:
- The handle of the cup is wrapped with twine in several layers, fixed with a glue gun;
- The same is repeated with the body of the water tank;
- The coffee beans are applied at the bottom of the mug, where the thickness of the twine or twine is greatest;
- Grains are applied strictly in 1 layer;
- The composition is completed by a vintage bow attached to the handle of the mug.
Unusual coffee topiary: photo with a cup
Many have seen unusual handmade gifts, but everyone decided to make something similar with a cup. In addition to the method described above, it is not difficult to create a flying composition at home. For work, you will need a cup, saucer, strong wire or cutlery, coffee beans and decorative items, depending on aesthetic preferences.

The further procedure is as follows:
- A piece of wire is bent on both sides by 3-4 cm using pliers;
- The lower part of the saucer, where the base of the composition is attached, is covered with protective plastic;
- The same is repeated with the outer rim of the cup;
- The air structure is fixed using Moment glue or hot melt glue;
- The base is wrapped in several layers with twine and fixed with glue;
- The coffee beans are applied to the base in several layers;
- Optionally, the saucers are decorated with pebbles, tinsel, beads or just coffee beans.
A wedding is one of the most memorable events in the life of every person. That is why they are looking for gifts and decorative items for her the longest.
You can make a good wedding present yourself. This will require natural coffee beans, 2 pieces of strong wire, glue, decorative materials and a little imagination.

A wedding is a harmonious union of two people, therefore, it is this idea that the designers propose to implement:
- With the help of pliers, both wires are bent in an arbitrary way;
- Take 2 balls, each of which personifies the image of the bride and groom;
- In the first case, 2 layers of glued grains are decorated with a mini-bow, and in the second, with a cylinder;
- The curved wire leading to the lady's ball is decorated with pink fabrics or threads, and the gentleman gets a dark version;
- Colored fabrics, beads, coins or colored stones are used to decorate the pot.
3 more ideas for wedding topiary can be found in the material:
Making poppies topiary with coffee: master class
Master classes come to the aid of novice masters, telling in detail how to create a floral masterpiece. Poppies will help to decorate a living room decorated in a classic style. A seemingly laborious composition is created in a few hours. The main thing is to be calm and focused.
- Black threads;
- Coffee beans;
- Gypsum;
- Small balls of green or small balls for topiary;
- Several decorative items to choose from;
- Scissors;
- Decorative grass;
- Crepe paper;
- Hot glue.

Rubber balls are cut into two equal parts, which are stuffed with padding polyester. After that, both halves are trimmed with a fabric that matches the color of the coffee beans. Then the grains are applied in two layers using a glue gun.
To create the petals, you need a strong wire that runs through the bases in the form of balls. Once it has gone through, it is aligned in the shape of petals with pliers.
To make the petals, you need maroon paper, cut into small pieces. After that, one of the previously cut balls is pierced with a strong wire and fixed with glue. As soon as the workpiece has dried, the top half of the cut ball is pasted over with red petals.
You will learn how to make an unusual organza topiary in this material:
Topiary "dollar" from coffee: making a gift for the chef
Finding a good gift is not so easy, so for many it becomes obvious the need to make it with your own hands. When it comes to the birthday of an executive or business partner, it is better to choose a composition in the form of a dollar sign. Even if there are no significant reasons on the nose, the money tree will complement the interior of the room.

In order to make a coffee dollar you need the following:
- A piece of thick cardboard on which a dollar sign is drawn;
- A piece of steel wire bent in the shape of a sign;
- Fasten the curved wire onto a piece of cardboard;
- Cut out a currency sign similar in its parameters from cardboard and cover the first part;
- Wrap the workpiece with a jute rope;
- Pierce the workpiece in the middle with two parallel pieces of wire and wrap them with a jute bundle;
- Fix with a glue gun on the grain blank (the first layer is installed with a strip down, and the second with a strip up)
- Fix the product to the base.
Airy topiary made of coffee and satin ribbons - a delicate DIY gift
Floral motifs are the most common element in living room decoration. They found their reflection in unusual compositions made of satin ribbons. Depending on the selected flower, the appropriate color of the material is selected. For example, to create a sunflower, you need pieces of ribbons of a golden or slightly beige color.
Butterflies or ladybugs act as additional decorative elements.

For work, you will need the following materials:
- Glue gun;
- Stick as a base;
- PVA glue;
- Aromatic coffee beans;
- Gypsum;
- DVD or CD disc;
- Beads of a suitable color;
- 1 candle;
- Scissors;
- 3 types of satin ribbons;
- Clay pot.
The only difference from the above described mechanism of operation is associated with the design of the decorative part. To begin with, pieces of satin 5 cm wide are cut.For a full-fledged composition, you will need about 40 pieces. They are folded in half and one of the edges is trimmed neatly. Then the 2 ends of the folded ribbon are glued together in the middle. Next, pieces of colored tape are attached to the CD with a glue gun.
Topiary from coffee beans (video)
Topiary made from coffee beans is a stylish decoration for a bedroom, living room or office space. This unusual craft will become a memorable gift for loved ones. It's easy to do it yourself. This will take several hours and a little imagination. The initial sketch is made on paper, and then the necessary materials are selected on its basis.
Topiary from coffee (photo)


We bring to your attention a master class in which we will tell you how to make a tree of happiness with your own hands.
Tools and materials Time: 4 hours Difficulty: 4/10
- crown base;
- flower pot;
- coffee beans;
- glue gun;
- gypsum;
- decorative ornaments.
We bring to your attention a selection, which contains 3 of the best techniques for creating a coffee tree. All of them are described and illustrated in great detail. Get inspired and get creative!

The tree of happiness from coffee beans "Vanilla topiary"

We need:
1) Coffee beans
2) Kebab skewers
3) Ball for the Christmas tree
5) Scissors
6) An empty jar of cream (or something else, the main thing is that the shape is similar)
7) Burlap
8) Elastic band
10) Instant coffee
11) Ribbons (optional)
1) Remove the tip from the Christmas tree toy
2) We take a few kebab skewers and put them in a ball
3) We glue the coffee beans to the ball. We do it gradually. First, one side - wait until it dries, then the other. Multiple layers can be glued

4) Take burlap and cut out a circle

5) We wrap the jar from under the cream with the resulting circle, fixing with an elastic band

6) Fill the jar with plaster and insert the tree
7) When the gypsum is dry, cover it with instant coffee

8) Decorate with various ribbons


This is the simplest topiary, let's move on to more complex ones.
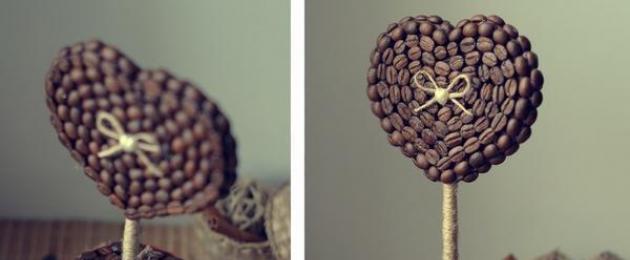
Coffee tree "Heart in love"

We need:
2) Pencil / felt-tip / pen
3) scissors
4) Wire
6) Cotton swabs
7) Thick thread
8) Coffee beans
9) Tin Can
10) Wooden ice cream sticks
11) Jute rope
12) White and brown paint
13) Foam rubber
14) A variety of decoration accessories (optional)
1) Fold a sheet of paper in half and draw a half heart

2) Expand and cut. Here's a heart that should turn out:

3) Take 2 pieces of wire and wrap with paper. For better fixation, grease with glue
4) Fold in half

5) Glue the wrapped wires to the heart

6) To make the heart more voluminous, we glue it with cotton swabs in two layers


7) Thoroughly wrap with threads, give a smooth shape

8) After the heart has become streamlined, paint with brown paint

9) We stock up on patience and paste over with coffee beans

10) Take a tin can and spread it with glue

11) Glue wooden ice cream sticks


12) After the glue dries, cover our pot with white paint
13) We take our heart and wrap the trunk with a jute rope


14) Insert the barrel into the foam blank and put it in the pot

15) Decorate the coffee heart with different accessories and get a great craft!


In this video, a similar tree:
Coffee tree "Parisian baobab"

We need:
1) Coffee beans
2) Styrofoam
3) Threads for knitting
4) Superglue
5) Wire
6) Masking tape
7) Pliers
9) Linen cord
How to do:
1) We make small balls from polystyrene

2) We wrap it well with threads. These balls are obtained:

3-6) We take reliable glue (The moment is perfect) and carefully glue the coffee beans. Leave a small area empty for planting on twigs


7) Using wire and masking tape, we make a tree frame

8) Trying on the pot

9) With pliers and a knife, we expose the ends of the frame

10) We wrap the entire frame with masking tape

11-12) When the entire frame is covered with masking tape, wrap it with a linen cord. To keep it tight, sometimes we grease it with glue

13) We put coffee balls on the frame. After that, we glue the grains on empty areas.

14) Fill the pot with gypsum and plant a tree

15) When the gypsum dries, sprinkle the base of the decorative tree with coffee beans

16) Let's move on to the most time-consuming item. We glue all the coffee balls with another layer. This time "facing" the top


The coffee tree is ready!
You have a question: "Why do we need" decorative accessories "?" This is for those who want to add even more personality to the product. You can decorate with anything you want. Turn on your imagination and start being creative!
This coffee topiary with artificial flowers and sisal is made on a Styrofoam ball. The tree is planted in a low clay cup, the trunk is reinforced with plaster cast. The crown is formed from coffee beans with bronze and gilding. The composition is complemented by a scattering of pearls and a decorative ladder attached to the trunk.
The total height of the coffee tree is 32 cm, cups - 4 cm, crown diameter with decor - 18 cm... To make a topiary of this size, you will need 4-5 hours.
Materials for coffee topiary "Dew drops"
- Foam ball (d = 14 cm).
- A cup of unbaked clay (150 ml).
- Decorative plastic ladder (12 cm) - 1 pc.
- Acrylic paint - chocolate, bronze and gold.
- PVA glue and brush, sponge.
- Coffee beans - 100 grams.
- Branch for the trunk (20 cm), emery sheet for grinding.
- Plaster of paris - 150 g, plasticine for fixing the trunk.
- Pearls (beads) - 1 pack, 100 pcs.
- Fabric flowers - 4 pcs.
- Cloth leaves - 8 pcs.
- Foamiran roses - 8 pcs.
- Decorative butterfly - 1 pc.
- Ribbons (organza and satin) - 10 cm each.
- Sisal light green color.
- Glue sticks for a hot air gun (used a diameter of 11.2 mm, length 25 cm) - 3 pcs.
 See also:
Garden of Eden coffee topiary with alder cones and delicate foamiran roses and doves in a sisal nest!
Video master class - topiary made from coffee beans and flowers
The video format for coffee topiary does not just duplicate the text master class, but in a sense is a separate and, possibly, more convenient tool. Watch, get inspired, generate new ideas and share them with your friends!
How to make a coffee tree with your own hands - MK in 1 picture

Did you like the format of the master class in 1 picture? See everything from Alena Tikhonova!
Step-by-step master class with a photo - coffee topiary
Pouring a clay pot, fastening the trunk
Stage 1. Preparation of the barrel... For the coffee topiary, a trunk from a wild branch of corilus was used: for painting, it was necessary to carefully grind the surface with a pumice stone (you can use sandpaper). Purchased corilus sticks are supplied smooth.
We attach the prepared trunk with plasticine to the bottom of the cup, having planned in advance where the crown will be. We sharpen the opposite end to simplify the subsequent fixation of the ball.


If there is a drainage hole in the pot (flower), carefully glue it with tape and plasticine so that the solution does not leak out.
Step 2. Filling the pot... We mix stucco or alabaster 1 to 1 with warm water (but not hot). We fill the pot almost to the top, leave it for a day so that the gypsum is completely hardened. After drying, we open the surface in 2 layers with PVA glue to improve the adhesion of decorative materials to gypsum.


Crown formation from coffee beans
Step 3. Painting the foam ball... The design of the coffee tree involves coating the coffee beans with bronze, so a rough painting of the ball is more an option than a necessity: the paint layer will prevent the hot silicone from melting the foam... Paints of any color are suitable, we recommend using acrylic - hands will not get dirty, such as from gouache.


Stage 4. Bonding coffee beans. It is much more convenient to glue the coffee until the ball is fixed on the barrel. We choose whole and even halves, without flaws. We glue the grains one by one, with the outer side up, coating a small area of the ball with silicone or Dragon glue. A perfect coffee surface is not required for bronzing, so this method - the faster one - is perfect.
We fill the entire surface of the coffee topiary, leave only a small circle under the hole into which we attach the barrel to glue. It is necessary to prepare the hole in advance by cutting it with a sharp object so that the ball does not burst when fixing.


Instead of coffee, you can use pistachio shells, beans, or any other material that is similar in shape. Any original ideas? Write in the comments or on social networks!
Bronzing coffee topiary
Stage 5. Painting the crown... With acrylic - antique bronze (with a brush or from a spray can), carefully paint over the coffee beans and the gaps between them in 1 layer. Drying time - up to 30 minutes. After bronzing, take a sponge and gold acrylic: lightly, in a chaotic manner, powder the surface of the coffee topiary.


Stage 6. Painting the barrel... After the crown, we proceed to painting the trunk and ladders: it is convenient to work in this order. Bronze the trunk in 2 layers, the ladder in one.


Crown decoration
Stage 7. Main flower arrangement... On one side of the topiary ball, we form a composition of 3 large fabric flowers with an organza backing and a narrow satin ribbon. Next we glue 3 foamiran roses on twisted satin ribbons. Glue a decorative butterfly on the opposite side.


Stage 8. A scattering of pearls... Over the entire surface of the coffee tree ball, in a chaotic manner, we glue pearls abundantly - in the cracks between the grains.


Stage 9. Leaves... At the base of the ball, glue 2 leaves and 3 foamiran roses, decorate the composition with pearls. In addition, we glue 3 leaves under large fabric flowers.


Flowerpot decoration
We glue sisal on the plaster surface in a circle to completely cover the plaster. A wide twisted ribbon of dark brown color, a leaf, 2 foamiran roses and a fabric flower - a composition at the base of a coffee tree. On the opposite side, fix the ladder, distribute the remaining pearls evenly over the sisal.


Photo - presentation of finished topiary made from coffee beans


The coffee tree is a wonderful surprise, an original table decoration and an addition to the interior. Such decor is distinguished by its simplicity of manufacture, environmental friendliness, beauty and incredible aroma. For those who love unusual gifts, as well as hand made, it will be interesting how to make a coffee tree with your own hands. To complete the craft, you only need a little patience and creative inspiration.
What is topiary
Topiary is called ornamental trees, which are made from improvised tools and natural materials. It is believed that this hand-made technology dates back to the days of the Roman patricians, in whose gardens the trees were cut in a special way. The crowns had an unusual shape, usually reminiscent of statues and various decorative objects.
Over time, the technology has changed, working on it in the monasteries of the Renaissance, Dutch and English gardens and labyrinths. Today, topiary is a popular type of gift.
The coffee tree, bringing visual aesthetic pleasure, will appeal to many thanks to its subtle aroma. Even after processing, the grains smell amazingly, creating an atmosphere of comfort and tranquility in the room. You can complement a decorative tree with a variety of vintage trinkets.


A tree made of grains is able to look harmoniously in the interior, regardless of style. It can be an apartment with a sophisticated classic style, a modern loft or minimalism. Topiary will look advantageous against the background of mint color and other shades of green. An original Christmas tree made of coffee beans can be placed in any room. You can decorate a street gazebo or free space on the veranda with a similar decor.
Such crafts are not just an addition to the design of the room, but also a symbol of well-being, prosperity and happiness. The tree always symbolizes vitality, so the topiary is great as a gift for both women and men.


Tools and materials
Prepare the following materials to make a coffee tree:
- Whole bean coffee. If possible, try to buy quality coffee. It is recommended to choose a product with uniformly roasted beans that are relatively uniform in size. They must be carefully dried. Coffee beans will need to be glued “flat”, but sometimes this is done by placing individual grains with “scales”;
- The foundation. A heart or a ball is taken as a blank. Such a base can be ready-made or made independently on the basis of cardboard or foam;
- Threads. They are needed in almost all variations of craft creation;
- Dye. This material will be required for application to the workpiece;
- Tube or stick, wire. They are necessary in order for the tree to have a trunk;
- Gypsum or alabaster (preferably with mixing utensils);
- Scissors;
- Capacity for a tree. There can be many different options here - from a homemade pot and bowl to store pots and vases;
- Scotch tape (required double-sided);
- Additional decorations. The craft can be decorated with various beads, ribbons and bows, carnations, cinnamon sticks, etc.


Coffee tree - step by step instructions
There are many options for how you can make such a craft with your own hands. We suggest that you familiarize yourself with the instruction, which combines several techniques at once and differs from others in its ease of implementation.
Stage 1. We work with a blank.
For a round topiary, use ready-made balls or make a ball with your own hands based on foam (it is better if wire is used for the barrel). You can also take the heart ready-made if you can find a suitable element, but you can also cut it out of a piece of foam.
The workpiece is pasted over with paper, wrapped with a thread (knitting), preferably of a dark color. Then it must be painted brown.
To make a symmetrical base for the crown of a tree in the shape of a heart, you will need cardboard (will serve as the basis), as well as cotton wool (needed to create volume). However, there is another way to make a heart. Cut out figures of the same shape from cardboard and place a tube between them as a trunk. The two figures are glued together. Only after that, you need to stick cotton pads on the finished base, which will be needed for volume.
When the workpiece is wrapped with a thread and painted in the desired color, it can be safely covered with glue and coffee beans. It is recommended to do this not in one layer, but in two, and the first is laid with the side with a flat surface inward, and the other - vice versa.
Stage 2. We design the core.
The tube or wire that you choose for the trunk should be covered with sheets of tissue paper, ribbons or string, and then glued to the crown. You can bend the wire if you like. In the case of a cardboard heart, you need to connect the parts a little earlier than for other blanks, only a small hole will be enough.
Stage 3. "Plant" a tree.
It is necessary to conveniently measure the amount of solution using a container into which you insert a tree. Prepare a mixture of alabaster or gypsum, pour into a pot. Then insert the topiary in the center and wait until the mass hardens. When everything is dry, cover the "soil" with an additional layer of coffee (you can replace it with shavings or sawdust, tea leaves).
Stage 4. We decorate the craft.
As decorations, you can use not only ribbons and beads, but also miniature figurines of animals, rough fabric for a pot, star anise stars for crown decoration, etc.


Original ideas for topiary
Feel free to experiment and get creative with your coffee tree. There are many different variations of topiary, here are some stylish ideas for crafts.
Classical
Traditional coffee topiary is round in shape. There are no special decorations, it is best if the craft is made in calm shades using natural materials. This is a simple and really elegant option that suits different interior styles.


Valentine
The heart-shaped topiary can be handed over on February 14th as a surprise. The base is sold in stores with floristic materials, but you can also make it yourself using available tools.


"Flying" cup
Crafts like these seem incredibly complex, but they are quite easy to do on your own. This will require a piece of wire, a glue gun or a can of polyurethane foam.


Tree with flowers
A tree with delicate flowers will be a wonderful surprise for a gift on March 8, birthday, etc. In addition, such a topiary can be placed in the living room or bedroom.


With birds and butterflies
Imagine a stylish tree with dragonflies, butterflies or birds sitting on it. This craft looks truly spring and reminds of warm days, regardless of the weather outside the window.


Fruit tree
Decorate the craft with dried fruit wedges, such as citrus fruits, for a wonderful decorative piece for a summer table. However, it is quite possible to supplement with such a topiary the New Year's table setting.


Money Tree
The coffee "money" tree is a good surprise for men. It can be made in the same way as an ordinary topiary, the only difference is that the ball needs to be pasted over with coins, then go around them with lightning and, at the end, cover with coffee beans.


New Year
The herringbone topiary will be a wonderful decoration for the table during the holidays, and will also complement the home New Year's atmosphere. You can buy the blank base additionally or make it yourself. To do this, just roll the cardboard in the form of a cone and cut off the excess pieces.


Double and triple
For such a craft, you need to spend more time, but the result will be a really beautiful topiary. Several crowns develop from one rod or "grow" from two or three trunks at once, which may have different thicknesses and heights.


Ball
This is not really a topiary, but a coffee ball is made in a similar way. The difference lies in the absence of a trunk, and in shape it will not at all resemble a tree. Can be combined in the composition of coffee beans with seeds, legumes. You can get a stylish option if you place several balls in a beautiful glass dish or vase.


A miniature topiary tree or, as it is also called, the "Tree of Happiness", is a wonderful gift for friends and family, you can also use it as one of the elements of home decor.
A homemade tree has an original appearance and personifies well-being; there is an opinion that it attracts wealth to the house.
In European countries, topiary, created from various materials at hand, have become an unusual element of decor, and in recent years such trees have begun to gain popularity in Russian floristry.
One of the most interesting options for such a craft is a topiary tree made from coffee beans.
In this article, we decided to offer several ideas for creating coffee trees: study master classes where the process of creating miniature trees from coffee beans is step by step considered, and surprise your family by making an original craft with your own hands.
Coffee topiary, photo
In the shape of a heart
Are you curious to know how to make a heart-shaped coffee bean topiary yourself? To do this, you will need the following materials:
- coffee beans;
- cardboard;
- pencil;
- scissors;
- rope;
- plastic container;
- cotton wool;
- strong wire;
- chocolate paint;
- glue;
- ribbons.
 Topiary Heart made from coffee beans
 Start creating a heart-shaped topiary by preparing a template of the required configuration. Draw the shape of the heart you want on cardboard with a pencil and cut it out neatly with scissors. Soak a cotton swab in glue and use it to add volume to the template. Drag the threads over the heart.
After the glue dries, apply paint to the base of the tree and start making the trunk according to the instructions above.
Decorate the trunk with ribbons. On the heart, attach a ribbon loop with glue, and then coffee beans. You can create a pattern of grains - it will look especially impressive against a background of solid paint.
The next step is to assemble the tree. Use alabaster or a similar product to fix the trunk. After completing the assembly, decorate the Coffee Heart topiary with ribbons.
 Heart shaped coffee topiary
 On a note! There are quite a few options for decorating and shapes of topiary in the shape of a heart, study the photo of the "trees of happiness" before you start creating them. Ready-made collections of beautiful photos will help you choose the most interesting option.
Small tree with a round crown
The simplest method for making such a craft is a small tree with a round crown.
To implement this idea, you will need the following items:
- foam ball for the base (it can be paper or filled with polyurethane foam);
- coffee beans;
- glue;
- wire or other device to simulate the trunk of a tree;
- a fast-setting mixture - for example, alabaster;
- capacity for installing trees;
- ribbons, multi-colored paper and other decorative elements;
- brushes, water and multi-colored paints.
 Topiary coffee tree, photo
 How to make a coffee topiary? Detailed step-by-step instructions for making coffee topiary suggest starting from the crown. If you do not have a light ball, make it from available tools. Cover the surface of the ball with grains.
Decorate the tube prepared for the trunk of the mini-tree (it can be a pencil or an unnecessary knitting needle) with tape, ribbons or string. In a bowl designed for installing a tree, prepare a quickly solidifying composition and fix the trunk of the future topiary. Hold the barrel in the desired position until the mixture hardens.
After that, start decorating the bottom of the ball with seeds. Glue them to the hardening compound in two layers. Fix the crown and trunk together using glue.
The finishing touch is the decoration of the tree with beads, bows and other decorative accessories.
 Topiary from coffee beans with your own hands, photo
 Watch a video with a master class on how to make coffee topiary with your own hands:
Topiary made of coffee and coins
In addition to coffee beans, other accessories can be used to decorate decorative trees. For example, you can make a topiary consisting of coffee and coins, supplemented with a zipper.
To bring this idea to life, prepare a spherical base by choosing a lock that is suitable in size.
Advice: in the event that you are using foam rubber, start by covering the ball with a loose layer of cotton wool and tightening with threads. This will ensure better adhesion of the grains.
Cover the rounded crown of the tree with a layer of brown paint. After it dries, attach the zipper (having unzipped it first) to mark where the spilled coins are simulated. Stick the coins with a heat gun - you should start from the center of the crown.
When finished with the coins, glue the zipper: use hot glue for this.
 Topiary made of coffee and coins
 Decorate the rest of the ball with coffee beans (two layers). But do not forget to leave room for the trunk of the topiary. Make a trunk, decorate it with ribbons and combine it with the crown.
Prepare utensils to accommodate the lucky tree. Make the container look attractive by wrapping it in paper. Glue the top of the container with grains. Using a hardening compound, fix the topiary and decorate it.
That's all the main secrets of making mini-trees. Choose accessories based on the characteristics of the interior of the room in which the topiary will be located.
The design may also depend on a specific occasion - in the event that you plan to donate your creation to someone.
 Topiary made of coffee with lightning and coins
 Coffee-flower tree
A great idea is to make a coffee topiary on the occasion of March 8, decorated with floral accessories, and give such a craft to someone close to you. It can be paper decorative items, beads, beads, satin ribbons and even jewelry. A lucky tree with a floral design can be decorated with handmade roses, violets and other artificial flowers.
A coffee-flower topiary is created using the usual technology. Decor elements in the form of flowers are glued to the crown at the final stage of work. The best option is to place them exclusively on one side.
If you want to make a topiary with more intricate floral decorations, for example, roses, first study the master classes that teach how to create mini-trees from shiny or satin ribbons and other techniques (for example, using the kanzashi technique).
 Topiary of coffee and flowers
 Topiary "Gentleman"
We bring to your attention another idea, simple in practical implementation, - a tree-topiary under the beautiful name "Gentleman" made from coffee beans. It will take about three hours to make such a craft.
You can create a gentleman's topiary according to a principle similar to the options described above. Make the head first, then the body and legs. The body with legs is made of thick wire, which is wrapped with a rope, twine to increase strength.
Important! The man must be stable, so it should be glued to a rigid, even base.
Having made a little man, decorate it with the help of available means: make a hat, a cane and other expressive details.
 Topiary Gentleman of coffee
 Floating bowl
Topiary in the form of a floating cup filled with coffee is a very original craft, which is not so easy to do on your own, but it's worth trying, because the thing will turn out to be very unusual.
To create such a topiary, you will need:
- coffee beans;
- wire;
- super resistant glue;
- a cup with a saucer;
- acrylic-based paints in white and chocolate shades;
- cloth (napkin);
Bend the wire along the inner shape of the cup - and arched along the remaining length (in this place, an imitation of flowing coffee will be recreated). Use rubbing alcohol to remove the grease from it and attach to the cup with superglue.
Let's make a mini cake at the bottom of the topiary. Insulation will help to give it porosity. Make five small rounded cake layers. Each subsequent layer should be smaller. Align the edges before gluing them together. Paint over the slices with white and chocolate paint.
The cut with the missing piece must be porous. Decorate the rest of the fabric using decoupage technology.
After the craft is dry, cut off the protruding edges, make a hole in the cake with a heated awl and paint it brown to make it look more realistic.
Pull the wire through the notch and bend at the end. Make a small niche on the bottom of the cake to mask the bend in the wire.
Decorate the cake with coconut flakes over the acrylic. Make a snake pattern on the platter using brown paint. Using glue, fix the bent end of the wire to the saucer. Combine the cake and saucer.
Decorate the part of the wire that is in sight with a napkin. Stick the coffee beans on the frame, pour some glue on the cake, mix the varnish and dye in equal proportions and cover with the chocolate-coffee simulated flow. You will create a realistic imitation of a cup of coffee and a saucer.
 DIY steaming cup of coffee
 Is it possible to make a topiary from coffee beans with your own hands? You can - watch another interesting video with instructions for making an original souvenir tree:
Sunflowers from ribbons and coffee
To create topiary in the form of a sunflower from coffee beans you will need:
- yellow tape 2.5 cm wide;
- drape green material;
- thin jute twine;
- Super glue;
- quickly solidifying mixture;
- wire;
- pencil;
- small tennis ball;
- papier-mâché ball;
- ruler;
- flower pot;
- small scissors;
- a device for burning out.
Use a 12 cm ribbon to make a flower leaf. Using a burning tool or glue, combine the bottom edges. You will need about 40 leaves.
Use papier-mâché and duct tape to create the inside of the sunflower. The base for the bud is a tennis ball. Stick on the base of the coffee and cover them with a colorless varnish. After that, pin the petals around the center of the flowers.
Make the stem of a sunflower from wire, treat it with glue and wrap it with twine.
Now it was the turn of the drape sepals. They are glued to the back of the decorative sunflower. The next step is to attach the flower to the stem. Glue small drape petals to the wire.
 Topiary Sunflower from coffee
 We fix the original sunflower tree in a container and wait until the alabaster mixture hardens. Decorate the top with multi-colored straws.
Using a similar technology, but using scarlet ribbons, you can make a coffee topiary "Poppies" or make a tree with roses or dahlias.
Money topiary
An excellent idea of the original presentation - topiary "Money tree".To create a coffee-money topiary, you will need the following materials:
- whole bean coffee;
- cardboard;
- rope or twine;
- bamboo stick;
- base for a tree, for example, a coffee cup.
 How to make a coffee tree topiary
 Decorate the base by wrapping string around the cup. Use a printed cardboard template for a US currency sign.
Important! The stencil should have volumetric slots, as when gluing the coffee seeds, most of the noticeable bends will no longer be visible.
Place the bamboo sticks against the cardboard and make sure the configuration suits you. If there is such a need, fasten two cardboard templates together. You can wrap the rope around them with glue. After that, cover the dollar with coffee beans, covering all cavities.
Wrap the rope around the four bamboo sticks as well. In the place where they will contact the dollar, use coffee beans - they will hold the sign. When finished with the top, prepare an alabaster mixture to secure the topiary. Place the tree at the base.
Take wooden skewers decorated with rope or coffee beans and glue to the dollar. Wait until it dries and decorate with accessories - the original present is ready.
 DIY coffee bean topiary
 How to make coffee and bead topiary
If you are fond of handicrafts and have the skills to create miniature jewelry, you can make a coffee bead topiary.
The most popular method for making a tree of happiness from coffee is the formation of a whole topiary with leaves made of beads with decorative elements from coffee beans. Such balls are made in the usual way: glue is applied to the base, and two layers of grains are applied on top.
Attention! The wire tree must be able to support the weight of the balls, so they should not be made too heavy.
The basis for the tree can be a cup in a saucer, fixed with glue. Wrap the trunk of the topiary with a napkin and paint. Decorate the crown with small accessories, for example, ribbons.
To increase the shelf life of the topiary, cover it with aerosol varnish.
 DIY coffee and bead topiary
 Coffee topiary, judging by the pictures and photos, are very diverse. Making crafts for interior decoration is a very exciting activity: see for yourself by making at least one mini-tree with your own hands according to the proposed MK.
- In contact with 0
- Google+ 0
- OK 0
- Facebook 0