The word "carving" comes from the English carving, which means "carving". Different types of carving are called carving - for example, on wood, stone or bone. The carving we are interested in uses fresh vegetables and fruits as a material. This art, which combines cooking and sculpture, is also called culinary carving.

Thailand is considered to be the birthplace of carving as a skill of figured cutting of vegetables and fruits - it was there that this skill originated about two thousand years ago. There is a legend according to which for the first time the table for the royal meal was decorated with skillfully cut fruits. Today, carving is a frequent element of ceremonial feasts: figured decorations made of fruits and vegetables add festivity and originality to dishes, being both a decoration and a treat at the same time. Experienced craftsmen create real sculptural masterpieces from ordinary watermelons, apples, cucumbers and pumpkins - but art education is not required to master the basics of carving. For work, professionals use large sets of various knives and other devices, but for beginners to comprehend this art, a small set of convenient tools may be enough.

Photo: youtube.com/Fruity Fresh Juicy


What tools are needed?

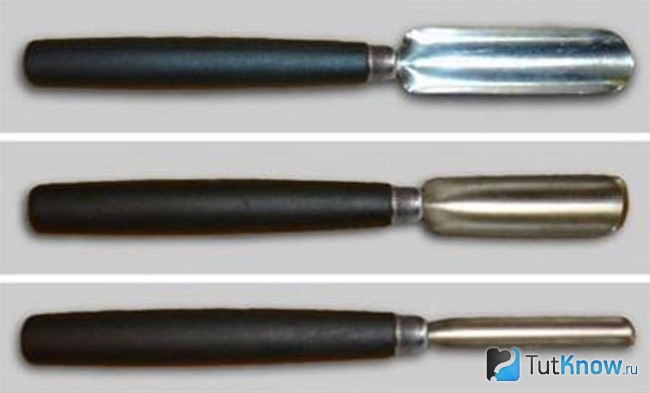
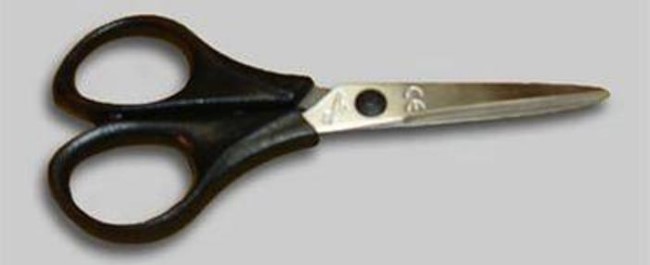
Here is a set of basic carving tools that professional craftsmen use. The main working tool is the so-called Thai knife (a small knife with a sharp blade, shaped like a sickle). Next to it to the left are carb knives, they are V-shaped, oval or round. A device that looks like an ice cream scoop is a noisette. Plus - a small knife of the usual kind is used (in the photo it is below), scissors to cut leaves, for example, lettuce, and devices similar to vegetable peelers.

All these are special professional tools. If you are serious about carving, you might want to purchase a similar set. Beginners can be limited to a small sharp knife, scalpel, scissors and a device for cleaning vegetables and fruits.
How to choose vegetables and fruits?

Photo: youtube.com/Mutita EdibleArt
You should carefully choose vegetables and fruits for carving, because the result of your work and how long this work will look beautiful and fresh will depend on their quality (the latter is relevant for a feast lasting several hours).

Choose dense, ripe fruits and vegetables of the correct form;
The rind must not be damaged;
Peel vegetables and fruits, if necessary, immediately before work;
Some vegetables (beets, carrots) are well soaked for 15 minutes in cold water before work;
So that peeled and chopped apples, pears and eggplants do not darken, sprinkle them with lemon juice or soak for 15 minutes in water with salt and lemon juice before work;
Ready-made figures from vegetables and fruits can be stored in cold water before serving;
On the table, it is good to sprinkle the figurines with ice water from time to time, so they will last longer.
Master classes: video
Cucumber lilies: master class
Carrot or cucumber bell: master class
Orange flower: master class
Cucumber rose: master class
Carved apple: master class
Zucchini and tomato flower: master class
Those who want to learn the art of creating pictures from vegetables and fruits can be recommended to attend a carving master class. Carving is an artistic cutting of vegetables and fruits. Carving from vegetables and fruits is a great opportunity to come up with a composition in an original technique, decorating a festive table for a family celebration. Carving - a technique for some is so new that the name is sometimes confused - they are looking for carling or something else similar in sound on the Internet. But what if you liked the technique you saw somewhere, and you want to try to create a small masterpiece from watermelon or carrots in your own kitchen? Of course, do not be afraid, and start learning step by step. To help you - a detailed guide, training video, and pictures in examples of finished work.
Carving lessons for beginners are a great opportunity to get step-by-step instructions for creating your own vegetable and fruit compositions using the figured cutting technique. Beginning craftsmen are advised to attend a master class or watch a training video, and only then proceed to making DIY carving masterpieces.
For that, to master the art of vegetable carving you will need the following tools:
- a special knife with a narrow and short sharp blade;
- knife with a wide blade for the manufacture of large elements of the composition;
- knife with a long narrow blade;
- small scissors for trimming the edges of vegetables;
- thin wooden sticks (like toothpicks) for holding vegetables together.
List of the most common vegetables, from which you can create an original work with your own hands:
- pepper (hot or sweet);
- radish;
- cucumbers;
- cabbage;
- pumpkin;
- potato;
- tomato.
By attending a master class on vegetable carving, some craftsmen will learn how to create original still lifes with their own hands, using the natural properties of different vegetables: color, texture, hardness. The main thing is creativity, patience and accuracy.
Gallery: carving from vegetables and fruits (25 photos)


Fruit carving for beginners
 For fruit carving you will need approximately the same tools as for figured carving of vegetables. But at the same time, it must be borne in mind that fruits have a softer and looser texture, so when working with them, in no case should you press the knife hard. If the novice master remembers this, he will be able to create a real masterpiece with his own hands. Fruit carving at a children's party will look especially beautiful.
At a fruit carving master class, beginners are usually offered to make a picture with their own hands from:
- apples of different varieties;
- citrus fruits (oranges and lemons, less often - tangerines);
- watermelons;
- melons (choose those varieties that have fairly hard pulp).
The simplest version of fruit carving- making a figured basket of watermelon or orange with your own hands. A novice master can easily cope with this work by watching a training video. The finished basket can be filled with other fruits or berries, it will serve as a wonderful gift or decoration of the festive table. And the kids will just love it. The main thing is to skillfully beat the natural properties of fruits in the work: color, texture and shape.
Figured carving of vegetables and fruits is a creative activity. You can come up with ideas for creating compositions on your own, as well as borrow from experienced professionals by watching a video or attending a master class.
However, regardless of the creative idea, when creating vegetable and fruit paintings with your own hands, you must keep in mind the following:

Other uses for carving
 Carving opens up for beginners wide scope for creativity. Beautiful compositions can be created with your own hands not only from vegetables and fruits, but also from cheese. And there are craftsmen who are engaged in artistic carving on soap. A master class and a training video can be easily found on the Internet.
Chrysanthemum from Chinese cabbage
|
1. Remove loose leaves from a head of Beijing cabbage weighing from 300 to 700 g and cut off the upper part of the head, leaving about 12-15 cm. |
2. We work with an oval or triangular carbide groove knife. |
|
 3. Let's make cuts of different lengths along the thick veins of the leaves, directing the knife from the top cut of the leaf to the base of the cabbage. We make the beginning of the cut thinner. As we approach the stump, we deepen the knife into the cabbage. |
4. Without cutting 1.5-2 cm to the stalk, remove the cut out large leaves. If the sheet is held tight, make a few notches with a small knife. |
|
 5. We cut the subsequent rows of leaves in the same way, shortening the length of the chrysanthemum petals to the middle. If the edges of the petals are thin enough, then in cold water they will curl up into rings or curve beautifully. |
 |
|
|
6. Put the "chrysanthemum" in ice water for half an hour. The product will take on an elegant shape. Let's cut a couple of green "leaves" from a cucumber and make a composition on a dish with salad or various cuts. |
||


|
Ready dahlias |
 1. Let's make a slightly flattened rounded blank with a diameter of 5-6 cm from a homogeneous product. |
|
 2. Cut out 7-9 petals with a medium oval knife, deepening the knife towards the core. |
 3. We cut off the excess pulp under the petals of the first row, forming a platform for the next row. |
|
 4. Cut out the petals of the next row with knives of different sizes, similarly to the first row. We place them between the petals of the previous row. We make as many rows as possible. |
 5. We cut to the end and make out the middle. |

 |
 |
 |
 |
 |
 |
Faces can be made better: 
 Tomato flower
 |
 |
 |
Make 8 deep cuts on the tomato, as shown in the photo. Carefully separate the skin so that a little pulp remains on it.
Cut cucumber slices of a suitable size into halves and insert into the cuts.
Decorate the top of the "flower" with an olive or herbs. Santa Claus from vegetables  You will need: red bell pepper (larger), Chinese cabbage (head lettuce), a piece of cucumber, toothpicks for fastening.
 |
1. Remove the leg from the pepper and give it a stable position with the hole down. 2. Fasten a piece of cucumber on top with a toothpick. 3. Choose small lettuce leaves, preferably internal ones. Try on their size on the figure of Santa Claus: one sheet is longer - for the beard, three sheets are shorter - for the hair. Cut off the excess parts of the cutting. Pick up a cup-shaped sheet for the top layer of hair. 4. During the fitting, mark with a toothpick those places on a large sheet where the eyes, nose and mouth should be. 5. Make details of the face from pieces of olives and peppers by inserting them into small slots. Strengthen your mustache. 6. Attach with toothpicks (you can use their halves), first a long sheet with a face and a beard, then three short ones around the entire head. Put a top sheet on top. 7. Make a cap from the top of a pepper or a small tomato. Take a large leaf of head lettuce (outer) and cut a long strip 1.5-2 cm wide from the top of the petiole with a knife. Try to cut along the direction of the fibers. This will be the edge of the hat. Fasten the hat on the head and wrap it with a cut-out strip. |
 |
Capricorn (22.12 - 20.01) Required: 1 red and 1 green apple Take a whole red apple. Cut off a slice and two slices from it. Lay the slices on top of each other. This is the "torso." Cut the remaining slice into two halves. Cut out two triangles from them - "horns". Attach the cut off sector to the horns. Cut off two pieces from it. These are the "ears". The remaining part is the "head". Lay "ears". Lay the "head", "horns" and "ears" on the body. Cut circles from the peel of a green apple - "eyes". "Pupils" of green bones. Cut another slice from the remaining apple. Cut out four stripes from it - "legs". Add "legs". Cut a beard from a piece of green apple peel. |
|
 |
Aquarius (21.01 - 20.02) You will need: 1 pitted green olive, 1 corn kernel, 1 salami slice Take one pitted olive. Cut it lengthwise into two halves. Cut off a sector from one half. Expand and attach this sector to the slice. This is a "jug". Cut off a small sector from the second half. Attach it to the bottom of the "jug". Cut a small slice from the remaining olive. Cut it into two halves. These are the "handles" of the "jug". Attach the "handles" to the "jug". Place half a grain of corn at the "neck" of the "jug" in the form of pouring water. |
|
 |
Pisces (21.02 - 20.03) You will need: 1 green olive, 4 corn kernels, 1 black olive, 1 slice of salami. Take one pitted green olive. Cut it lengthwise into two halves. One of them cut across into 2 parts. One part is the "head". From the second part, cut the "tail". Lay out the "scales" from the corn kernels. Attach a "head" to it. Make an "eye" from a piece of black olive. Cut the other half of the olive in half lengthwise. One of them cut across into two halves. These are "fins". Attach "fins". Add another grain of corn. Attach "tail". |
|
 |
Aries (03/21 - 04/20) You will need: 1 pitted green olive, 1 black olive, 1 corn kernel, 1 salami slice. Cut the olive into two halves. Cut two thin slices from the second half. Make cutouts out of them. These are "horns". Insert the "horns" into the half of the olive. This is the "head". Place the remaining piece of olive cut side down. Cut it in half. Attach this piece to the "head". Cut the corn kernel lengthwise. Unfold the grain halves. These are the "eyes". Lay the "eyes" on the "head". "Pupils" are made from pieces of black olives. Lay on a slice of salami or canapé sandwich. |
|
 |
Taurus (21.04 - 21.05) You will need: 2 pitted green olives, 1 black olive, 1 corn kernel, 1 salami slice. Take two pitted green olives. Cut one of them lengthwise into two halves. One half is the "head". Cut the second olive in half crosswise. Cut off a slice from the second. Make a cutout on it. These are "horns". Place the other half cut side down. Cut out two pieces from it. These are the "ears". Lay out the "muzzle" from the remaining pieces. Cut the corn kernel lengthwise. Unfold the grain halves. These are the "eyes". "Pupils" are made from pieces of black olives. Lay the "eyes" on the "head". |
|
 |
Gemini (22.05-21.06) You will need: 1 pitted green olive, 1 black olive, 2 corn kernels, a piece of red sweet pepper, 1 slice of salami. Cut the olive into two halves. Cut out “handles” and “legs” from half an olive. From the second half of the olive, cut the same "torso". "Head" to make from a grain of corn. "Mouth" - from a piece of red sweet pepper. "Eyes" - from tiny pieces of black olive. Attach the "head" to the "torso". Make another "twin". Lay them on a slice of salami or on a sandwich - canape. |
|
 |
Cancer (22.06 - 22.07) You will need: 1 pitted green olive, 1 black olive, 1 salami slice. Cut a pitted green olive into two halves. Cut off two sectors from one of them. Make incisions in these sectors. These are "claws". Cut the remaining middle part into two halves. One half is the "torso". Cut the other half into pieces. This is the "neck". Lay on the "torso" "eyes" - tiny pieces of black olives. Attach "claws". |
|
 |
Leo (23.07 - 23.08) You will need: 1 pitted green olive, 1 black olive, 1 corn kernel, 1 pea, 1 salami slice. Cut a small slice from a green olive. Cut a sector out of it. Cut a thin slice from the remaining olive. Lay the first slice on it. This is a "muzzle". Attach the cut sector. This is the mouth. Cut two more thin slices from the remaining olive. Cut one of them into two pieces. Cut out of them "mane". From another slice, cut out two more details of the "mane". Attach "mane". Cut the corn kernel lengthwise. Unfold the grain halves. These are the "eyes". "Pupils" - from pieces of black olive. Lay the "eyes" on the "head". Make a nose out of canned green peas. |
|
 |
Virgo (24.08 - 23.09) Take a whole red apple, cut off a slice from it. Cut it into two halves and cut off 2 small sectors from each. These are "hands". The remaining parts are the "body". On the other side of the apple, cut another slice. Cut a circle out of it. This is the "head". From a thin slice of apple, cut out the "nose" and "mouth". Cut out "eyes" from pieces of green apple peel. "Pupils" cut from the peel of a red apple. Cut a thin slice from the remaining apple. Cut a circle out of it. Using the same notch, cut this circle into thin slices. It's "hair". Attach two parts of the "torso" to the head. Attach "hands" to the "torso". |
|
 |
Libra (24.09 - 23.10) You will need: 1 pitted green olive, 1 corn kernel, 1 pea, 1 salami slice Take a whole green olive without a stone. Cut it crosswise into two halves. Cut one of the halves into two more pieces. Lay them cut side up. These are the "bowls" of the scales. Cut a thin slice from the other half of the olive. Cut it into two pieces. Attach these parts to the "bowls". Lay a pea between them. Decorate with a grain of corn. Lay on a slice of salami or on a canapé sandwich. |
|
 |
Scorpio (24.10 - 22.11) You will need: 1 pitted green olive, 1 black olive, 1 corn kernel, 1 salami slice Take a whole green olive without a stone. Cut off a slice from it. Cut it into slices. This is the "body". Put the rest of the olive cut side down and also cut into slices. Three medium slices will be needed to make the "tail" and "claws". Cut one slice into pieces. Lay out of these pieces "tail". From the remaining two slices lay out two "claws". Attach them to the scorpion. Make a "head" out of a grain of corn. "Eyes" cut out of black olives. |
|
 |
Sagittarius (23.11 - 21.12) Required: 1 whole green apple Take a whole green apple. Cut off a slice from it. Cut off a small section from this slice, then cut off another section of the same size. Cut a thin slice from the rest of the apple. Cut out the middle from this part. This is "bow". Cut a thin slice from the apple. Cut an arrow out of it. Lay the "bow" and "arrow" on the apple slice. "Bow" to make from the cut off sections. |
Learn how to make a cone from carrots, chrysanthemum from onions, flowers from radishes and apples. And carving for beginners will help this, which everyone can master.
The content of the article:
Carving in translation from English means "cutting". In cooking, it is the art of artistic cutting of fruits and vegetables. This interesting type of creativity originated in Southeast Asia. Japanese cooks lined pottery in which food was served with leaves. They understood that the beautiful arrangement of the leaves gives the dish an additional appeal and began to artistically cut fruits and vegetables.
Later, carving penetrated Europe, but at first it did not have much popularity here. However, with the advent of restaurants, this art has become in high demand.

There are kits for artistic cutting for every budget and taste. But carving for beginners can be carried out without the use of special equipment for this type of creativity.
If desired, you can turn sets for wood cutting, for linocut into tools for carving.
The most important knife used in this type of creativity is Thai. That's what he is.

With the help of such a tool, you can perform various carving elements from vegetables and fruits. Therefore, if you have a similar narrow knife with a thin blade, you can use only one at the initial stage. As you master this technique, you can purchase additional equipment to create more and more complex and interesting compositions. For these, the following types of knives are used:
- Thai - sickle-shaped curved and wedge-shaped knives also belong to the group of these tools.
- Karbovochnye are V-shaped tools, as well as oval and round.
- Flute. Used to remove thin strips from fruits and vegetables. Flutes are the decorative grooves on such instruments.
- Noisettes are notch knives that are used to cut shapes out of fruit. They have a different shape (rhombus, round, clouds, etc.).
- Engraving and other carving knives with replaceable blades are used if you need to peel, remove the core; clean vegetables, etc.
- Culinary tools such as our domestic cookie molds.

Here is a sickle-shaped knife, which is used, like the Thai one, but they cut larger parts with it.

The fluting knife makes it easy to groove fruits and vegetables. First, longitudinal strips are made with this tool, and then, for example, a lemon is cut across in circles and flower-shaped figures are obtained.

Carving knives for carving come in various diameters. They can be V-shaped and U-shaped. The first is easy to cut out the leaves, to carry out engraving images on the fruit bark.

With the help of U-shaped knives, ornaments with rounded cuts are created.
Also included in the carving tools are small scissors. With the help of them, flat straight, oblique or other cuts are made along the edge of the fruit.
Another interesting tool for carving is a double-sided noisette spoon. It is used for extracting pulp from large fruits, cutting balls, hemispheres.
The noisette spoon is often used in French cuisine. Cooks use this tool to cut balls out of raw potatoes and then deep fry them.

If you have not acquired such tools yet, you can replace them by carving vegetables and fruits with a scalpel, a fruit peeler.

Decoration from vegetables - a flower from a radish
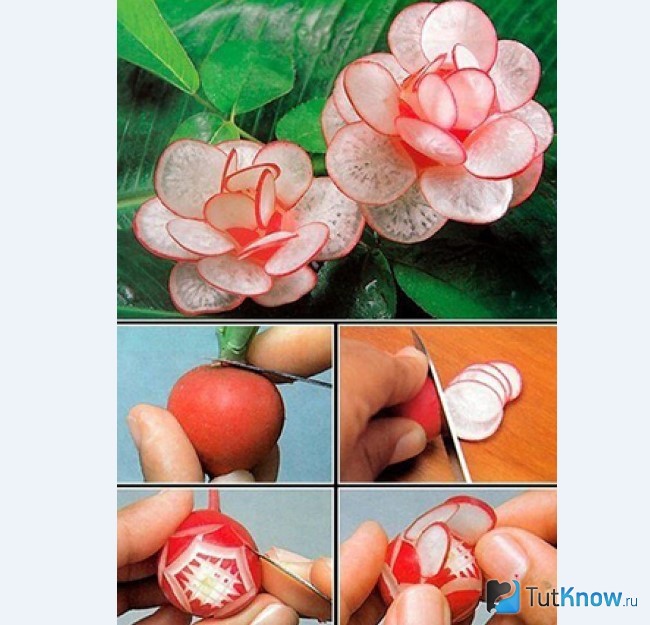
The dish looks much more attractive if such an edible flower flaunts in its center or side. Even those who have never done this before will be able to cut it out of a radish. For this decoration, you can use ordinary small scissors and a sharp knife. In addition to them, you will need radishes. The root crop should be even, rounded. In the photo it is red, but now those who grow this vegetable in their household plots know that radish varieties of various colors have been bred. Therefore, a lily from this vegetable can be red, pink, yellow and even purple.

Cut off the top of the radish and mentally draw a 5-gon here. Now lead from this place down with a knife (but not all the way) so that the first petal is indicated. So complete all five.
To make the next, inner row of petals clearly visible, cut around the layer of pulp that is located between the first and second row of petals.
Now take scissors and process all 5 petals of the outer row with them, sharpening the top of each, as shown in the photo.

Next, complete the second row of petals, which is staggered relative to the first. Then - the third and subsequent inner rows.
This is how you can make salad dressings from vegetables. Try to cut not only a lily, but also a rose from a radish.
To make it so multi-petalled, wash the root crop, cut off the green part from it. On the opposite side, make several parallel cuts in the center and then on the side of the root. Take another radish, chop it into thin circles. Insert them into the slots of the first root crop. Here is such an elegant flower you got. Find out what other salad dressings you can cut out quickly.
How to make a lily from an onion?
Here is such a wonderful chrysanthemum you will get in just 5 minutes of work.
For this carving you will need:
- large onion;
- sharp knife;
- a bowl of water;
- beetroot juice.

Now make a cut perpendicular to this, and then a few more. The more of them, the more fluffy the flower will turn out.

Pour water at room temperature into a bowl, lower the workpiece into it, let the onion soak in the liquid for 40-120 minutes. During this time, the petals will "bloom", and you will get a beautiful carving flower.
The time for soaking onions in water depends on the variety. Some will begin to “bloom” in as little as 40 minutes, while for others, the waiting time for this process will be longer.
Now moisten the workpiece in beetroot juice, and you will get such a wonderful flower.

You can, by turning the chrysanthemum over, moisten only the tips of its petals in the juice, or place the entire flower in the food coloring liquid.
How to cut a delicious carrot decoration?

Don't these bumps look bright, realistic and festive? You can make them using carving knives, or by taking a regular kitchen knife with a narrow blade.
Take a root crop with a diameter of at least 3 centimeters. Cut upwards so that the length of the carrot is 8–12 cm. Remove the extreme pulp at the wide end of the root crop so that a square “tail” remains.

Now process the workpiece from the same side along the turn, rounding its hangers from all sides. Then visually divide this top of the carrot into 6 parts, which will turn into scales of a do-it-yourself cone.
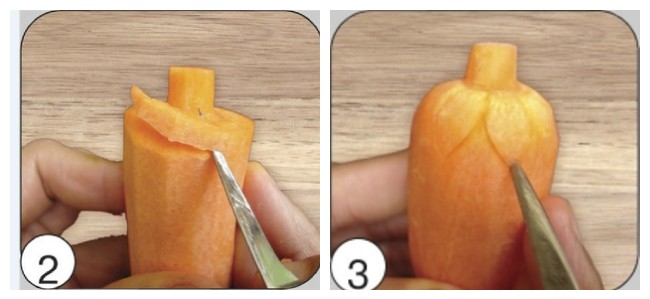
Deepening the tip of the knife by 2–3 mm, mark these scales. To prepare the area for the second row of scales, cut the carrot pulp in a circle just below the first. In the same way, but in a checkerboard pattern, complete the second row of scales. Beneath it again remove some carrot pulp in a cone to make the third row of scales, which will be staggered in relation to the second.

In the same technique, you can make a few more cones to create a beautiful vegetable bouquet.
To harden the carrots and open the scales, place them in ice water for 15 minutes.

If you were making this salad dressing, then put the cones in the center of the dish or place them around the edge of it. If you want to create such an amazing bouquet, as in the photo, then string the processed carrots on a wire wrapped in green floral tape. You will stick the second end of the wire into a pumpkin, the flesh of which is also carved using the carving technique. It remains to cut the petals from the cucumber, decorate the composition with dill, after which you can put it in the most prominent place in the house or in the center of the festive table.

If you have carving knives, then use a V-shaped knife to make pointed scales. A U-shape will help create rounded ones.
Today you learned how carving is made from vegetables. Follow the publications and soon you will learn how to artistically cut fruits that will turn into a firebird, a basket, and become colorful flowers.
In the meantime, check out the videos from which you will learn how to cut a rose from carrots, see what ordinary vegetables can be turned into with carving:


Required Tools
To create the simplest works, it is absolutely not necessary to use special tools. A sharp knife with a thin and flexible blade and a little patience is enough. If you are planning to seriously engage in carving, you should stock up on a set of special tools:
- Thai knife: the main tool that is indispensable when carving small parts; has a narrow and short sharpened blade;
- sickle-shaped knife: similar to Thai, but its blade is wider, it is used to cut out larger patterns;
- long knife: looks like an ordinary kitchen knife, but has a narrowed blade; is a universal tool and can be used for any type of carving;

- carving knives for cutting leaves, petals and other floral ornaments: they can be oval, V-shaped, round or square, wide or narrow;
- knives for cannelling (creating grooves);
- small scissors with thin blades to give the edges a decorative shape;
- spoon-noisetto for taking out the pulp;
- carving for removing the core of apples or pears and creating recesses in patterns: it looks like a knife with a circle-shaped tip;
- mini molds;
- girole: a tool for removing the thinnest layer from cheese and other soft products;
- toothpicks and gelatin for fastening parts.


Advice! Finished work can be boiled or fried. For example, making flowers from soft boiled carrots and beets is more difficult. Therefore, figurines are first made, and then they are steamed. Raw potato blanks can be deep-fried.
Preparing vegetables and fruits
Almost any vegetables are used for carving: Bulgarian and hot peppers, radishes, cucumbers, pumpkins, cabbages, potatoes, tomatoes, etc. Of the fruits, apples, oranges, lemons, melons and watermelons are the most suitable for work.
The main thing is that vegetables and fruits are even and smooth, with a minimum amount of pulp and seeds. Overripe fruits will not keep their shape, so you should not use them. Their colors are also important.


All vegetables and fruits are thoroughly washed and dried. Dense vegetables (potatoes, radishes, celery or ginger) are best taken out of the refrigerator first - in the heat they will wilt a little and become more plastic.
Apples and quince, prone to browning, are pre-sprinkled with a solution of vinegar, lemon juice. So that carrots do not break during work, they are soaked in salt water for a couple of hours. Cucumbers and tomatoes should be chosen the most dense, with a minimum amount of juice.
Advice! Fruits and vegetables can be stored in cold water for several days. So that they do not darken, they are sprinkled with lemon juice and diluted gelatin from a spray bottle. Watery fruits are not soaked - during storage they are only periodically sprayed with water.
The simplest examples of carving
With the help of virtuoso carving, you can create unusually beautiful edible pictures and ornaments from vegetables and fruits. However, the simplest works can be quite spectacular - the most important thing is to apply diligence and ingenuity.
We present to your attention the simplest carving of vegetables and fruits with a step-by-step photo:
- you can make an original flower using an ordinary potato peeler - for its petals it is enough to cut the thinnest layer in a circle, for example, from a radish, roll it into a tight spiral with the pulp inside, and then straighten it;
- from a pumpkin, watermelon or melon, you can make a spectacular basket or stroller for fruit, ice cream or pastries; for this, it is better to pre-prepare a paper pattern and cut the edges and handle along it with a sharp knife; such a product can be decorated with carvings in the form of a floral ornament;


- from a small pumpkin, funny cups are obtained in the form of a head of a tiger cub, a cat, a bear cub or a monkey; ears and other parts are glued with gelatin; instead of eyes, halves of olives or pieces of eggplant are used;
- you can get bright callas from hot pepper in a couple of minutes, if you cut it lengthwise from the stalk to the very tip, carefully remove the seeds along with the stalk, and then round the edges of the pepper with a knife; now, closer to the edge of the pepper, we make a small hole and insert the seeds into it along with the stalk; bright flower is ready.


Advice!To obtain through holes in a thick-walled pumpkin or zucchini, you can use a drill or drill.
Watermelon crafts
Pirates' ship


Turtle


More ideas


Spectacular dark burgundy roses
From the thin edges of the foliage of red cabbage and cucumber "cups" you can make unusual flowers. For this:
- the upper coarse leaves are removed from the cabbage;
- thin scissors cut off the edges of sheets 2-3 cm wide;
- petals are formed from the received stripes: on one strip, depending on its length, there can be 2–3 or more;
- the round tip is cut off from the cucumber and the pulp is removed; the edges of the resulting cup are shaped with cloves using scissors;
- ready-made cabbage petals are carefully inserted into each cucumber cup;
- in this way, several roses are prepared: buds are made from tightly twisted petals, and fully bloomed flowers from straightened ones;
- the stem is made from the pulp of any dense vegetable - for example, a radish or a vein of cabbage; to make it green, an onion feather is put on it;
- each flower is attached to the stem with a toothpick;
- foliage can be cut from a leek or green apple.


Advice!In the carving technique, the most important place is given to the sharpness of the tool. Poorly sharpened knives or knives made of poor quality steel will crush the workpiece.
Photo master class on creating roses from strawberries


Dahlia
More complex work is more convenient to perform with the help of special tools. For this work, you will need an oval billet of potatoes or large carrots, slightly flattened from the sides. It is better to take carrots without a pronounced core - otherwise the flower will exfoliate:
- to begin with, we retreat a couple of millimeters from the edge and cut out 7-9 petals in a circle with a medium-sized oval knife; the knife should enter the pulp deep enough, but not to the very edge of the workpiece;
- preparing the second row of petals; for this, we cut off part of the pulp under the petals of the first row; you don’t need to delete too much - the number of rows should be as large as possible;
- the tongues of the flower have different sizes, so they should be cut with different knives;
- the last we make out the core with the thinnest knife.


Advice! The resulting masterpiece can be preserved for a long time if it is first dried in the attic or near the battery, and then varnished. Of course, it will no longer be possible to eat it after varnishing.
Salads, meat or fish dishes can be decorated with elegant snow-white chrysanthemum. To make the petals thin and lay naturally, it is better to take a small thin-walled bulb:
- after cleaning, it should be slightly cut off the top and bottom (no more than half a centimeter);
- with a thin knife, cut the onion crosswise, not cutting to the bottom of 0.5 cm;
- the incision should begin from the upper part from which the feather grows;
- if the incision is shallow, then the flower will not open well, but if the head is “opened” almost to the end, then it may simply fall apart;
- again cut the onion crosswise so that the cut line falls on the center of the previous cuts;
- we continue to make cruciform cuts to get the maximum number of slices;
- no need to try to separate the slices with your hands, otherwise the flower will break; you just need to put the bulb in cold water for an hour - the chrysanthemum will bloom by itself; if the onion walls are denser (depending on its variety), it may take more than an hour for the flower to bloom;
- to color chrysanthemum, you can dip it in food coloring, beetroot, cherry juice, blackcurrant juice, red wine or saffron infusion; You can shade not the whole flower, but only its tips.

 Floral theme - a favorite for carving specialists
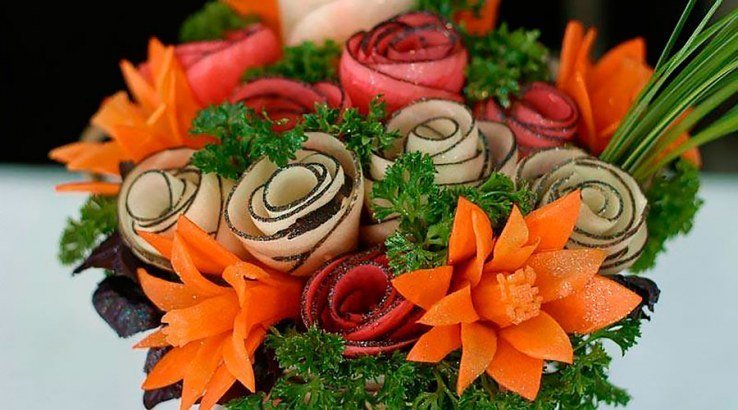
Advice! Bulb flower may have larger segments. To make it, it is necessary to cut only the top two layers into four parts, carefully straighten the first layer of petals, and remove the second with a knife. Do the same with the next layers. In the finished flower, the petals are staggered relative to each other.
Rosette of tomato, orange or lemon
To make this bright flower, you will not need special tools - only a sharpened knife:
- cut the tomato in half;
- cut the resulting half into small equal semicircular slices;
- “stretch” the chopped tomato on the board, trying not to displace any of its parts;
- gently twist one of the edges of our figure;
- to move the finished flower to the dish, you should clasp it on both sides with your hands and squeeze it tightly;
- With a small sharp knife, cut out a couple of green leaves from the skin of a cucumber for a rose; you can make them from thin strips of cucumber, folded in half; Making an orange rose is very easy.
- the upper leaves and the rough lower part of the stalk are removed from the head of cabbage so that the leaves do not fall apart;
- its upper part is cut off almost in half so that 12-15 cm remain from the place where the leaves are attached in the area of the former stump;
- we will work only with large veins of cabbage, its green parts are completely removed;
- thin sections of different lengths are made along the veins with a carb knife from the top to the center of the head; closer to the stalk, the knife goes deeper - we should get petals that are thin at the edges and denser towards the center;
Advice! Decorations must be combined with the dish to taste. It is better to decorate hot fish or meat with tomatoes, carrots, cucumbers. Sea delicacies are in perfect harmony with lemon. Fruit is the perfect decoration for dessert.
To work, you will need an oval or triangular carb knife with a special groove and a small tight head of Chinese cabbage:
Advice! To master the carving of vegetables and fruits for beginners (see photo), it is absolutely not necessary to purchase a whole set of tools. Some of them can be made independently. For example, you can make a carving knife using a thin olive lid. It is bent at an angle so that a groove is obtained. For carving, you can use any wood carving tools.
multi-petalled radish flower
You can quickly make such a flower with a regular sharp knife. To do this, the upper and lower parts are slightly cut off from the radish and several parallel cuts are made on the sides of the root crop. The more often they are located, the more elegant the flower will turn out.

The second radish is cut into thin circles-petals. The resulting petals are carefully inserted into the slots of the first radish.
It is better to master the carving of vegetables and fruits from a photo or video.
- In contact with 0
- Google+ 0
- OK 0
- Facebook 0